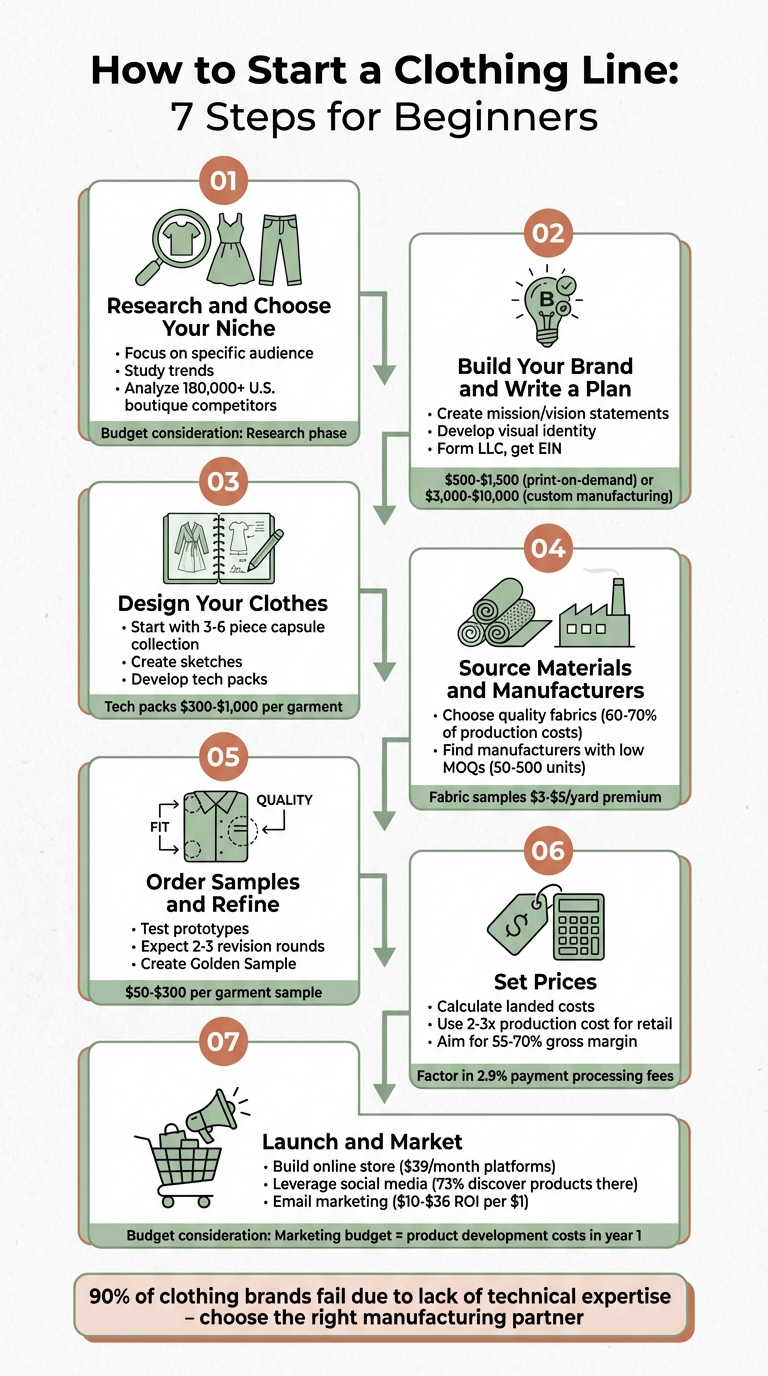
Starting a clothing line in 2026 is easier than you think - if you follow the right steps. Here’s a quick rundown:
- Research and Choose Your Niche: Focus on a specific audience (e.g., size-inclusive workwear or eco-friendly activewear) and study trends, competitors, and market gaps.
- Build Your Brand and Write a Plan: Define your mission, vision, and brand identity. Create a business plan covering goals, target market, and finances.
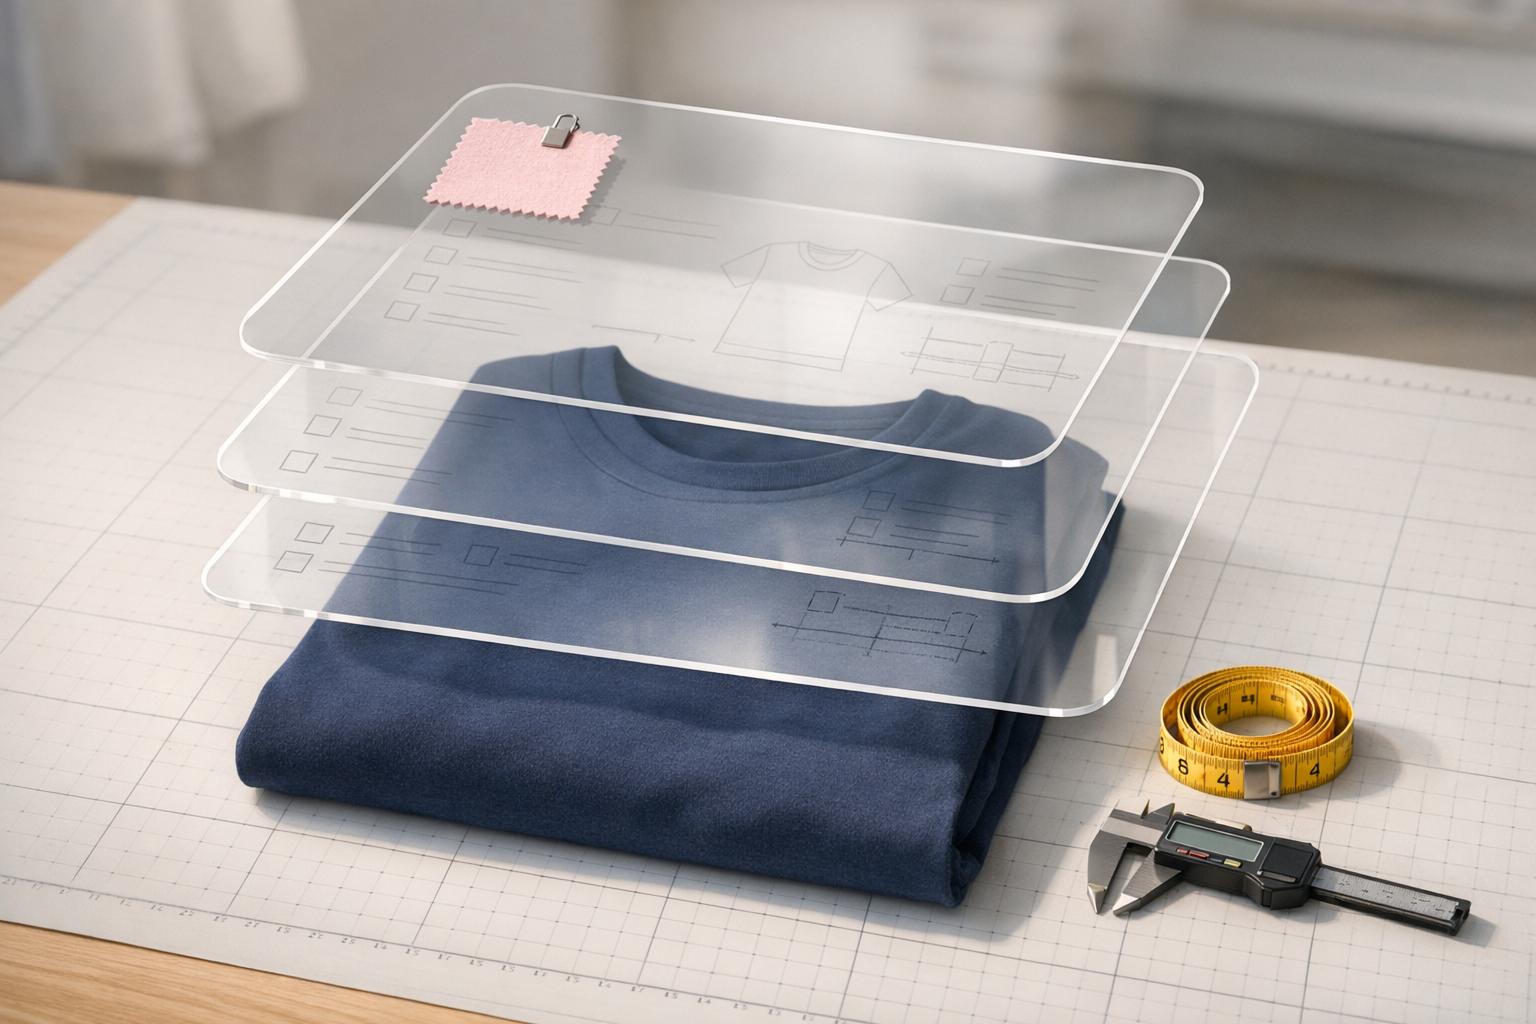
- Design Your Clothes: Start with a small capsule collection (3–6 pieces). Use sketches, digital design tools, and tech packs to finalize your ideas.
- Source Materials and Manufacturers: Choose quality fabrics and reliable manufacturers. Look for low minimum order quantities (MOQs) to reduce risk.
- Order Samples and Refine: Test your designs with prototypes, tweak as needed, and finalize a pre-production sample to ensure quality.
- Set Prices: Calculate costs, including production, shipping, and overhead. Use industry-standard pricing (e.g., 2–3x production cost for retail).
- Launch and Market: Build your online store, promote on social media, and collaborate with influencers. Use email marketing and pop-ups to engage customers.
Even with a budget of $500–$1,500 (print-on-demand) or $3,000–$10,000 (custom manufacturing), you can test your ideas and grow. Start small, focus on quality, and connect with your audience to make your clothing line a success.
7 Steps to Start a Clothing Line in 2026
HOW TO START A CLOTHING LINE: THE ULTIMATE GUIDE
sbb-itb-76527d2
Step 1: Research Your Market and Choose Your Niche
Instead of trying to cater to everyone, focus on a highly specific segment of the market. For instance, rather than just "womenswear", you might concentrate on something like "minimalist, size-inclusive workleisure for professional women" or "technical outdoor gear made from recycled materials". This kind of precision can help your brand stand out in a crowded field, with approximately 180,000 clothing boutiques competing in the U.S. alone.
Define Your Target Customer
Start by building an Ideal Customer Profile (ICP) that goes beyond basic demographics like age or income. Dive deeper into your audience's values, daily challenges, shopping habits, and the brands they already trust. For example, if you're targeting eco-conscious professionals, consider whether they prefer cruelty-free fabrics or value transparency in supply chains.
A helpful approach is the "Why, Who, How" framework:
- Why: Define your purpose - why are you starting this line?
- Who: Pinpoint your ideal customer - who needs what you're creating?
- How: Clarify your brand voice and style - how will you communicate your message?
As designer Sarah Donofrio puts it:
"The trick is finding what you're good at and focusing on that."
Study Current Fashion Trends
Stay on top of emerging trends by using tools like Google Trends, Instagram Analytics, and TikTok. These platforms can help you identify what's gaining traction. Popular trends right now include sustainable fashion with recycled fabrics, athleisure and streetwear, gender-neutral designs, and adaptive clothing for people with disabilities. The key is to adapt these trends to fit your brand. For instance, if athleisure is booming and your focus is woven tops, consider creating a crop top that pairs well with leggings.
Look at search data and consumer behavior to guide your design choices. Fashion newsletters and online communities, such as Reddit's "Streetwear Startup" forum, are also great resources to stay ahead of shifting trends.
Research Your Competition
Understanding your competitors can reveal market gaps and help you set pricing benchmarks. Customer reviews, for example, often highlight unmet needs or recurring frustrations - insights that could shape your brand's offerings. Study their standout products, pricing strategies, and sales channels, whether they sell directly through their website, social media, or third-party platforms. Don’t overlook indirect competition, such as thrift stores and consignment shops, which might inspire alternative ways to attract your audience.
Take Quince, for example. By focusing on high-quality basics and maintaining a transparent supply chain, the direct-to-consumer brand raised $200 million in mid-2025, reaching a valuation of over $4.5 billion. Similarly, in 2023, designer Natalie Bell launched Natty Belle by sourcing Malian mud cloth - a unique mineral-infused textile her competitors weren’t using - to create distinctive car coats. These examples show how identifying and addressing market gaps can give your brand a competitive edge.
| Research Method | Best For | Tools/Resources |
|---|---|---|
| Social Listening | Tracking trends and aesthetic changes | Instagram, TikTok, Pinterest |
| Search Analysis | Measuring demand for specific products | Google Trends, SEO keywords |
| Competitive Analysis | Finding market gaps and pricing insights | Competitor websites, reviews |
| Community Research | Gathering feedback and industry knowledge | Reddit, fashion incubators |
Step 2: Build Your Brand Identity and Write a Business Plan
Once you’ve nailed down your niche, it’s time to shape your brand’s personality and lay out a clear plan for growth. This step is all about creating a brand identity that resonates with your audience and crafting a business plan to guide your decisions. Remember, your brand isn’t just a logo - it’s the promise you make to your customers about what they can expect from you. And with around 80% of consumers needing to trust a brand before making a purchase, getting these fundamentals right is key.
Write Your Mission and Vision Statements
Your mission statement captures what your brand stands for today and the problem it solves for your customers. Think of it as your “Why.” For instance, a mission like, “To create beautiful, functional maternity wear that helps new mothers feel confident and comfortable”, clearly communicates purpose. Keep it short and to the point so it’s easy to share and remember.
On the other hand, your vision statement looks ahead, describing where you want your brand to be in the next three to five years. For example, “To become the leading online retailer of business casual and evening wear for women ages 25–40”. This forward-thinking goal keeps you focused as you grow. Both your mission and vision should align with your core values and reflect what your audience cares about. Once you’ve nailed these, you’ll have a strong foundation to build a visual identity that matches your brand’s ideals.
Develop Your Visual Brand
Your visual identity is made up of a few key elements: your logo, color palette, typography (fonts), imagery (photos and videos), and supporting graphics like icons or patterns. Start by researching what’s common in your niche and look for ways to stand out. For example, if muted colors dominate your market, a bold and vibrant color scheme could make your brand pop. Think about your brand’s personality - whether it’s modern, playful, or luxurious - and make sure every visual element reflects that vibe.
Consistency is vital. Use the same visuals across your website, social media, and packaging to build recognition and trust. Once you’ve decided on a brand name, lock down your domain and social media handles right away to secure your online presence. A cohesive visual identity will strengthen your overall strategy and help your brand stick in people’s minds.
Create Your Business Plan
Your business plan is where your brand identity meets strategy. A solid plan should include:
- Executive Summary: A one-page overview of your goals.
- Company Description: Details about your mission, legal structure, and business model.
- Market Analysis: Insights into your target audience and competitors.
- Product Line: Information about your designs, including sketches and fabric details.
- Marketing and Sales Strategy: Plans for social media, e-commerce, and other channels.
- Financial Projections: A roadmap for the next three to five years.
When choosing a legal structure, forming an LLC (Limited Liability Company) can help protect your personal assets from business liabilities. You’ll also need an Employer Identification Number (EIN) to manage taxes and set up a business bank account.
Startup costs can vary widely. If you’re going with a lean print-on-demand model, you might spend between $500 and $1,500. On the other hand, custom manufacturing could cost anywhere from $2,000 to $25,000 or more. Be sure to break down costs for materials, production, shipping, and overhead.
As designer Sarah Donofrio puts it:
"In fashion, you're not just costing fabric and buttons and labor. You're costing shipping, you're costing heating and rent."
Set clear, measurable milestones to track your progress and refine your approach as your business grows. These steps will help ensure you’re building a brand and strategy that can thrive.
Step 3: Create Your Clothing Designs
Now that you’ve established your brand identity and mapped out your business plan, it’s time to bring your ideas to life. This step blends imagination with practicality as you turn your concepts into garments ready for production. Start small - focus on a few key pieces that tell a unified story rather than attempting to create an entire collection upfront.
Sketch Your First Designs
Before you start sketching, build a mood board. Use platforms like Pinterest or Instagram, or even a physical board, to gather images, textures, and colors that reflect the essence of your collection. This will keep your designs aligned with your brand’s vision.
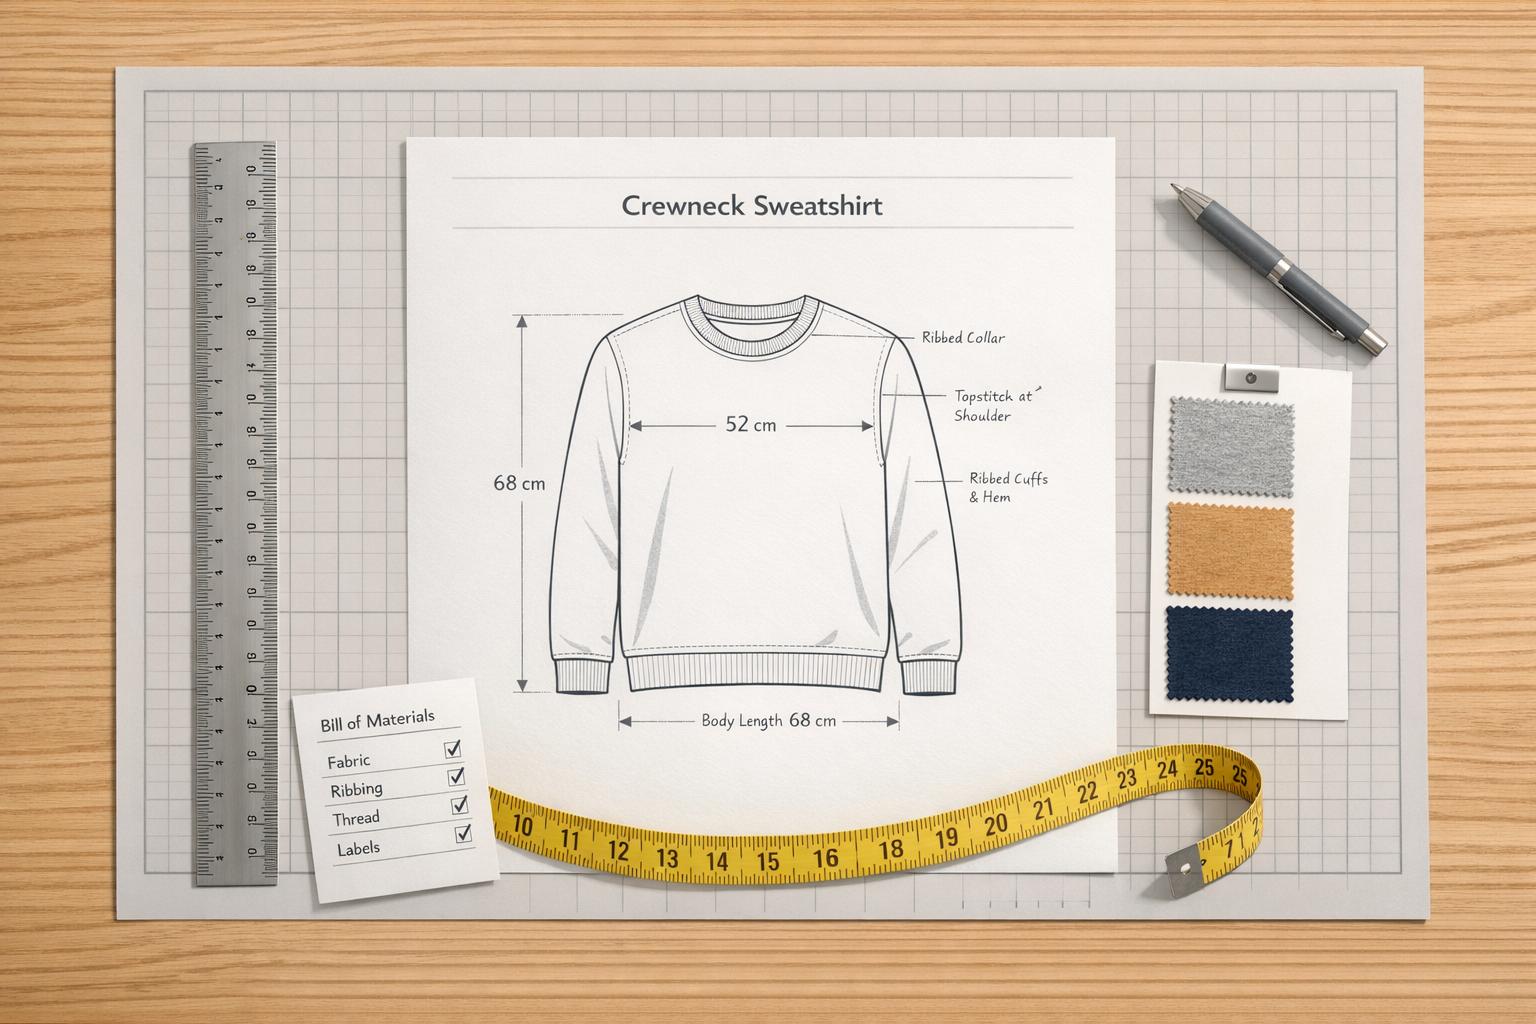
If sketching feels intimidating, fashion croquis (basic body templates) can help. These outlines let you focus on the garment’s shape and fit without worrying about perfect anatomy. Be sure to include both aesthetic and functional details - like seam placement, pocket locations, and stitching types. Multiple views (front, back, and side) give manufacturers a clear understanding of your design.
For your first collection, aim for a capsule of three to five core pieces that feel cohesive, almost like a “family.” This approach simplifies production and reinforces your brand’s identity. Designer Sarah Donofrio, known for her work on Project Runway, emphasizes the importance of capturing your ideas as they come:
"I take my sketchbook everywhere with me. As I'm sketching away, I often note when a sketch could become a distinctive pattern." – Sarah Donofrio
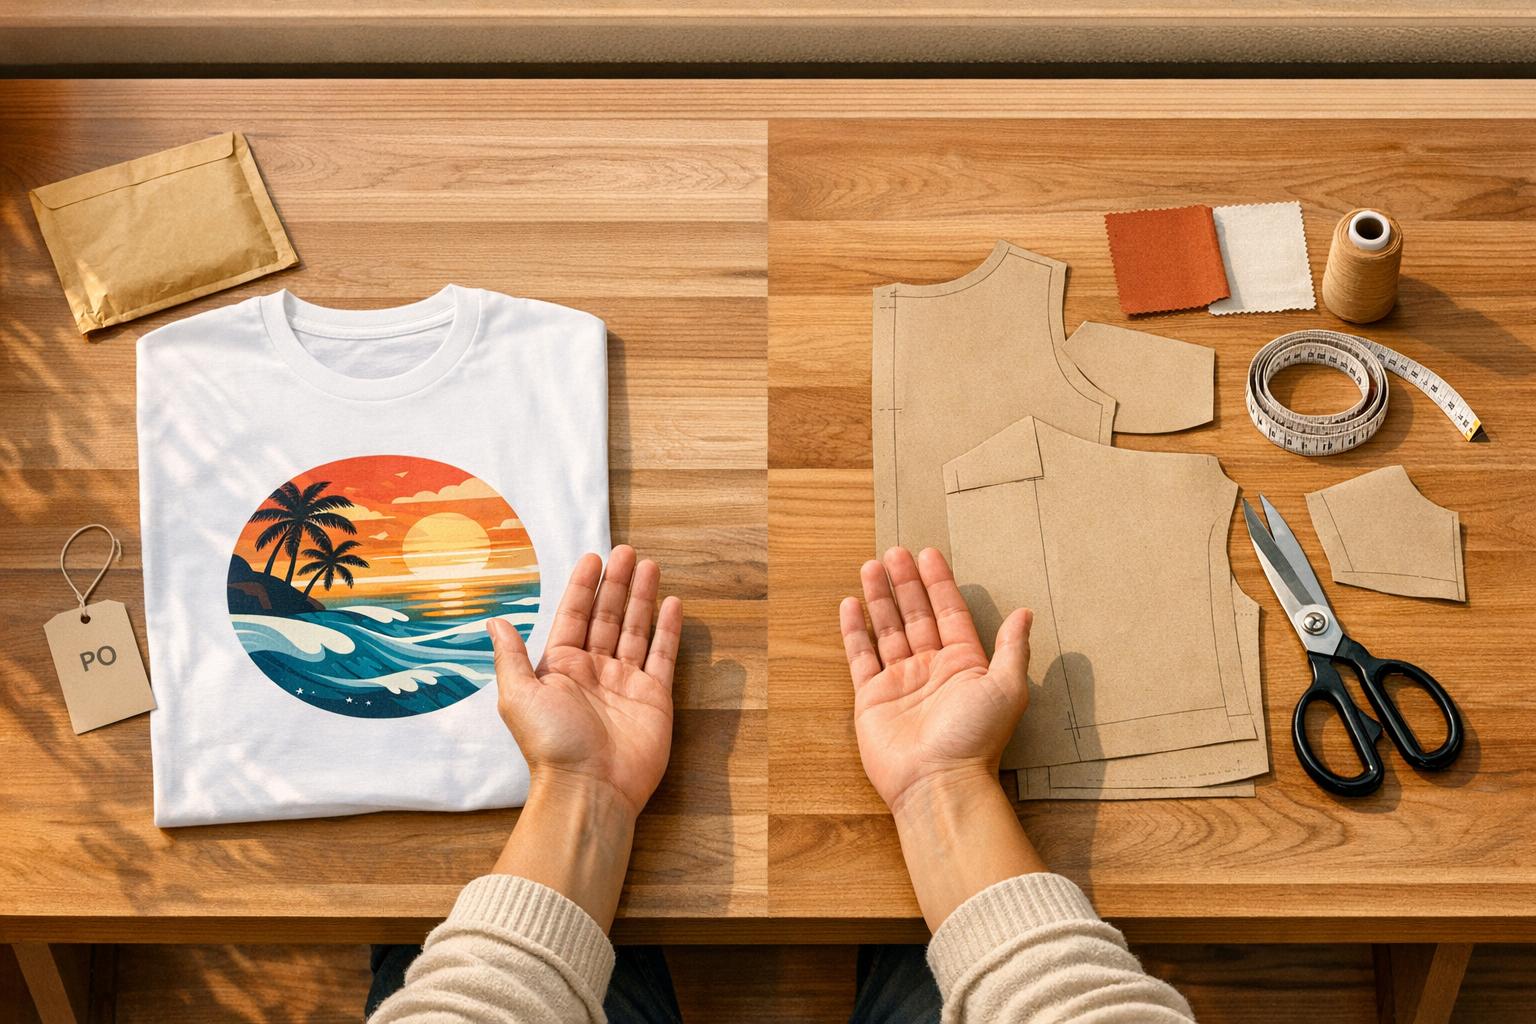
You might even start with a single standout piece - like a customizable t-shirt - to test your brand’s identity and refine your approach before expanding.
Create Digital Design Files
Once your sketches are complete, the next step is creating production-ready digital designs. Adobe Illustrator is the go-to tool in the industry, offering scalable vector graphics that maintain quality at any size. If Illustrator isn’t in your budget, tools like Photopea (a free alternative) or Canva (great for mockups) can also get the job done, though they might lack the precision needed for detailed production specs.
Save your designs in vector formats like AI or SVG to ensure they remain sharp when resized. In Illustrator, features like clipping masks can help you apply patterns or textures precisely, while the "Scale Strokes and Effects" option keeps line weights consistent during resizing. If you start with a raster image (e.g., PNG), use the "Image Trace" feature to convert it into a vector file.
Your finalized designs should be compiled into a tech pack. This document includes all the details - measurements, materials, and more - that manufacturers need to bring your vision to life. If creating a tech pack feels overwhelming, consider hiring freelance experts via platforms like Fiverr or Upwork. Costs for production-ready tech packs typically range from $300 to over $1,000 per garment.
Select Fabrics and Plan Garment Features
Choosing the right fabric is about balancing style and functionality. A good starting point is counter-sourcing - using an existing garment as a reference to identify the weight, composition, and feel you’re aiming for. Decide between knits (ideal for stretchy pieces like t-shirts) and wovens (better for structured garments like button-downs).
For beginners, in-stock or deadstock fabrics are practical options. Deadstock fabrics - leftover or rejected materials - offer a sustainable and distinctive touch, though availability can be limited. Always order sample yardage to create prototypes and test for durability - like how the fabric holds up after washing - before committing to bulk orders.
Document every feature of your design in the tech pack, from deep pockets to decorative stitching. As Sarah Donofrio wisely notes:
"You can't just have pretty clothes. You have to know every detail." – Sarah Donofrio
If possible, create your first samples by hand. This hands-on experience helps you understand the construction process and labor involved. If you’re working with local factories, visiting their facilities can give you insight into their craftsmanship and ensure they can handle your chosen materials, whether it’s delicate silks or rugged denim. With your designs finalized and your tech pack ready, you’ll be all set to move on to sourcing materials and selecting a manufacturer in Step 4.
Step 4: Find Materials and Choose a Manufacturer
Now that your designs are finalized, it’s time to tackle the next big step: sourcing quality materials and selecting a manufacturer. These decisions will shape the quality and cost of your product, so it’s important to approach them thoughtfully.
Find Quality Fabrics
Start by identifying the right fabric for your garments. One effective method is counter-sourcing, where you use a reference garment to communicate the weight, texture, and overall feel you’re aiming for. To make this process smoother, request header cards from suppliers. These cards include fabric swatches along with essential details like weight (measured in GSM), width, fiber content, and composition.
Understanding fabric types is key. For example, knits - made from interlooped yarns - are great for stretchy items like t-shirts and activewear. On the other hand, wovens, which interlace yarns at right angles, work better for structured pieces like denim jackets or button-down shirts. Keep in mind that fabric typically accounts for 60% to 70% of your production costs, so choosing the right type is critical for both quality and profitability. Be sure that your selected fabrics align with the specifications outlined in your tech pack.
When sourcing fabrics, you have four main supplier options:
- Mills: Offer the lowest prices but require high minimum orders (500–1,000+ yards).
- Converters: Buy raw fabric and finish it with colors or patterns. They usually have medium minimums (around 100 meters per roll).
- Jobbers: Sell surplus or deadstock fabric with very low minimums (as little as 1 yard). While great for testing, reordering might not be possible.
- Wholesalers: Provide stock-supported programs with low minimums (10–50 yards), making them ideal for small businesses.
If your brand emphasizes eco-friendly practices, look for certifications like GOTS (Global Organic Textile Standard) for organic materials, OEKO-TEX for chemical safety, or GRS for recycled content. With 54% of consumers willing to pay more for sustainable products, this could be a smart move. The sustainable fabrics market is also growing at an impressive 13% annually through 2037.
Before committing, order 5 yards of sample fabric to test for shrinkage, colorfastness, and durability. Expect to pay about $3–$5 more per yard for samples compared to bulk pricing.
Select a Clothing Manufacturer
Finding the right manufacturer is just as important as sourcing materials. Start by determining which production model fits your needs:
- Full Package Production (FPP): Handles everything from sourcing materials to shipping finished products - ideal if you don’t have an in-house technical team.
- Cut, Make, Trim (CMT): Requires you to supply fabrics and patterns, giving you more control over the process.
- Private Label: Lets you rebrand existing items with custom labels, offering a faster route to market.
Minimum order quantities (MOQs) can be a major consideration, especially for new brands. Traditional overseas factories often require 400–500 units per style, but some manufacturers cater to startups with much lower MOQs. For instance, OneAimApparel accepts orders as small as 50 units, allowing you to test demand without overcommitting financially. Choose a production model that aligns with both your current needs and future goals.
When evaluating manufacturers, focus on their communication and reliability. Delayed responses during the inquiry phase could signal potential production issues. For overseas partners, request video tours of their facilities and ask about their experience working with brands at your stage. Certifications like ISO 9001 (quality management), WRAP (ethical production), and GOTS (organic materials) can also help verify their credibility.
"A manufacturer doesn't just produce your clothes - they help bring your brand to life." – Apparel Entrepreneurship
Sampling is a non-negotiable step. Budget between $50 and $300 per garment and plan for two to three rounds of revisions to fine-tune fit and construction. As James Kennemer from Cosmo Sourcing advises, "If you approve a flawed sample, you will receive a flawed bulk order." Take the time to get it right.
Compare Manufacturing Plans
Different manufacturers offer varied levels of support and customization. Below is a comparison of OneAimApparel’s production plans:
| Plan | Minimum Order | Best For | Key Features |
|---|---|---|---|
| Basic Production | 50 units | First-time founders testing ideas | Low MOQ, custom design support, worldwide shipping |
| Standard Production | 100+ units | Growing brands expanding lines | Design and sampling services, quality control, eco-friendly materials |
| Premium Production | 300+ units | Established brands scaling up | Advanced customization, premium fabrics, bulk pricing, dedicated support |
When comparing manufacturers, don’t just focus on the quoted price per unit. Calculate the landed cost, which includes fabric price, shipping, duties, and insurance. For example, a t-shirt costing $5.80 from a factory in Guangzhou might have a landed cost of $7.50 after shipping and customs. Meanwhile, a domestic manufacturer charging $18 per unit could result in a landed cost of $19, with faster turnaround times and easier communication.
Location plays a big role in lead times. Overseas production can take 4–12 weeks for custom fabrics plus shipping, while domestic manufacturers often deliver finished goods in 4–6 weeks. If you’re planning an October launch, start development by early summer to allow time for sampling, revisions, and production.
Finally, be aware of the real MOQ. Sometimes, fabric or trim minimums exceed the garment MOQ, increasing your overall costs. Manufacturers like OneAimApparel help avoid this issue by maintaining an inventory of popular fabrics, which can be used across multiple orders. Payment terms typically involve a 30% deposit upfront and the remaining 70% before shipment.
Step 5: Order Samples and Refine Your Designs
This is where your ideas start to take physical form. Once you’ve chosen your manufacturer and materials, sampling lets you test whether your designs work as envisioned. Think of this phase as a stress test for your garments - it’s where potential issues are uncovered and fixed. Expect to go through two to three rounds of revisions to perfect your designs before they’re production-ready. Catching problems now will save you from expensive mistakes later.
Request Sample Garments
Begin by ordering your first prototype. This initial sample is your chance to test the basic design and construction. Be prepared to spend between $80 and $250 per style for each round of sampling. If you're working with a company like OneAimApparel, their Basic Production plan is a cost-effective option for startups, especially if you’re testing multiple designs.
Your tech pack is your contract - everything the manufacturer needs to know should be in there. If a detail is missing, the factory isn’t obligated to include it. Before the sample ships, ask your manufacturer to confirm that all measurements match your specifications.
When the sample arrives, measure it flat against your Points of Measure (POM) before fitting it on a model. This step is crucial because fabrics can stretch during wear. Use a Sample Evaluation Sheet to document details like seam allowances, stitch quality, and trouble spots (e.g., pockets or zippers). If you’re uncertain about the fabric content, a small burn test can confirm the fiber composition.
Collect Feedback on Samples
Don’t just analyze your sample on a hanger - test it in action. Have it fitted on a professional fit model or someone with measurements that match your target customer. Ask them to perform everyday movements like walking, sitting, or bending. This will reveal fit issues that aren’t obvious when the garment is static.
According to TEG, "The clothing sample is more like a stress test. That's because this sample will tell you whether your sketchbook ideas and fabric choices are holding up in the real world".
Get specific feedback from your fit model. For instance, instead of vague comments like "It feels tight", aim for actionable notes like "Increase HPS to Hem by 1 inch." Take photos of problem areas and annotate them for clarity. You can also use pins to temporarily adjust the fit during your review session, helping you visualize potential improvements without making permanent changes.
Ask your manufacturer for shrinkage and colorfastness reports early on. If you’re producing multiple sizes, order a size set sample (e.g., XS, M, XL) to ensure the grading is consistent across the range.
Make Final Design Adjustments
After evaluating your samples, communicate any changes to your manufacturer as soon as possible. A video call can be helpful to clarify revisions and avoid miscommunication. Detailed tech packs and clear documentation can reduce the number of sampling rounds and speed up your production timeline by about 40%.
Once you approve the final Pre-Production Sample (PPS), keep a physical copy as your "Golden Sample." This will serve as your benchmark for bulk production. Some brands refer to this as the "red tag sample", using it as a quality reference if production doesn’t meet the agreed-upon standard.
As designer Heidi from Sew Heidi explains, "A well-executed sampling process and prototype review saves fashion brands heaps of time and money as it helps catch issues early to avoid costly and irreversible mistakes during mass production".
Step 6: Calculate Costs and Set Your Prices
Once your designs are finalized and samples are approved, it’s time to crunch the numbers. Properly calculating costs is more than just covering expenses - it’s about ensuring your business has the financial foundation to thrive, not just survive the first year. Fabrics and trims alone often make up 40% to 60% of your total production cost. Getting these numbers right is critical to avoid pricing missteps that could hurt your competitiveness or shrink your profit margins. Now, let’s break down how to calculate costs and set prices that work.
Calculate Your Production Costs
Start with your landed cost using this formula:
(Production Cost + Shipping) × (1 + Duty Rate) + Taxes
For example, if a hoodie costs $30 to produce, $2 to ship, and has a 15% duty rate, your landed cost comes to about $36.80 before taxes.
To get a clearer picture, divide your expenses into three categories: development, production, and operating costs. Spread your development costs - like tech packs and samples - across your first production run to find the true cost per unit. For instance, if you’ve spent $2,000 on development for 200 units, that’s an extra $10 per item added to production costs.
Don’t forget to budget for fabric waste (typically 5% to 10%) and factory overhead, which usually adds another 10% to 20% on top of labor costs.
Here’s an example breakdown for a premium hoodie:
| Item | Cost (per unit) | % of Total |
|---|---|---|
| Fabric (1.5m @ $12/m) | $18.00 | 45% |
| Labor (CMT) | $14.50 | 36% |
| Trims (Drawstrings, Labels) | $2.50 | 6% |
| Packaging & Sustainability Code | $0.80 | 2% |
| Landed Shipping | $1.20 | 3% |
| QC & Management | $3.00 | 8% |
| TOTAL COGS | $40.00 | 100% |
With a landed cost of $40, this hoodie could retail between $120 and $160, following standard industry pricing models.
Determine Your Retail Prices
Once you’ve nailed down your costs, it’s time to decide on a pricing strategy. A common approach is keystone pricing, where wholesale equals 2× the landed cost, and retail equals 2× the wholesale price. For example, a $40 hoodie would wholesale for $80 and retail for $160. If you’re running a direct-to-consumer (DTC) brand, the markup is often higher - around 2.5 to 3 times the landed cost.
Another option is value-based pricing, which focuses on how much your customers are willing to pay based on quality, brand perception, and other factors. Luxury brands often use markups ranging from 3x to 10x or more. If your products feature eco-friendly materials, like GOTS-certified organic cotton or recycled nylon, you can command higher prices since many shoppers are willing to pay extra for ethically sourced goods. For items priced between $20 and $50, aim for a gross margin of at least 4x your production cost.
Keep an eye on hidden costs that can eat into your profits. Payment processors, for example, charge around 2.9% plus $0.30 per transaction. Add to this customer returns, shipping supplies, and duties or tariffs, which can tack on another 15% to 35% to your expenses. To stay on track, aim for gross profit margins between 55% and 70%.
"Pricing psychology: You don't always have to compete on price. In fact, competing on price is sometimes a race to the bottom!" – Heidi from Sew Heidi
Manage Your Budget
Once your pricing is set, it’s critical to stick to a budget that supports both cash flow and growth. Order sizes should balance unit costs and inventory needs, while leaving room for a 10% to 20% buffer for unexpected expenses. Most manufacturers require a 50% deposit upfront, with the balance due before shipment, so plan payments around production milestones.
For smaller budgets, consider starting with a low minimum order quantity. For example, OneAimApparel’s Basic Production plan lets you produce as few as 50 units, helping you test the market without a massive upfront investment. Be prepared to spend as much on marketing in your first year as you did on product development. With customer acquisition costs ranging from $25 to $50, underfunding your marketing efforts can be a costly mistake. It’s worth noting that about 20% of small businesses don’t make it through their first year.
When setting prices, factor in discounts for end-of-season sales. Experts also recommend having six months of operating capital - typically $5,000 to $22,000 - set aside before launching. This financial cushion allows you to restock popular items, tweak designs, and weather slow sales periods without running out of cash.
Step 7: Launch Your Store and Market Your Brand
With your pricing strategy finalized, it’s time to launch your store and start selling. The North American fashion ecommerce market is expected to grow by 34% from 2024 to 2028, reaching $244.29 billion. This growth represents a huge opportunity, but success hinges on creating a store that turns visitors into customers and marketing it effectively.
Build Your Online Store
Your website is the heart of your business, so it needs to look polished and work seamlessly. Start by selecting an ecommerce platform like Shopify, BigCommerce, or Wix. Basic plans typically cost around $39 per month and include essentials like hosting, security, and updates. Secure a domain name that reflects your brand (e.g., yourclothingline.com) and set up a professional email address (e.g., support@yourclothingline.com) to establish credibility.
Make sure your site includes key pages:
- Homepage: Feature an eye-catching call-to-action.
- About Us: Share your brand’s story and values.
- Contact Page and FAQ: Provide easy ways for customers to get answers and reach out.
Your product pages are critical. Include high-quality photos - on-model, flat lay, and close-ups - and detailed descriptions that cover materials, care instructions, and sizing. Offer multiple payment methods and a guest checkout option to minimize cart abandonment, as 18% of U.S. shoppers abandon carts due to complicated checkouts.
To reduce returns, add detailed sizing charts using inches and include visuals like photos or videos showing how items fit on different body types. Once your store is ready, shift your focus to driving traffic with targeted marketing strategies.
Market Your Clothing Line
After launching your store, it’s time to let people know about it. Social media is a powerful tool in fashion, with 73% of U.S. shoppers discovering new products on platforms like Instagram and TikTok. Short-form videos under 60 seconds work particularly well - showcase your designs in motion or share behind-the-scenes clips of your creative process. For instance, during the 2024 holiday season, Gay Pride Apparel leveraged social media and print-on-demand logistics to generate over $300,000 in sales, including $35,000 on Black Friday alone.
Partnering with micro-influencers (1,000–100,000 followers) can also yield strong results. These creators often have higher engagement rates and more authentic connections with their audiences compared to larger influencers. Encourage customers to share photos of themselves wearing your clothing using a branded hashtag - user-generated content builds trust and acts as social proof.
Take inspiration from brands like Asphalte, which used onsite product surveys and a pre-order model to generate 4,000 monthly leads in November 2025. By allowing customers to vote on which styles to produce, they reduced overproduction and increased customer loyalty.
Email marketing is another highly effective tool, offering returns of $10 to $36 for every $1 spent. Start building your email list before launch by teasing your collection on social media and offering early-access perks. Set up automated email flows, such as welcome discounts, cart abandonment reminders, and post-purchase follow-ups, to keep customers engaged.
Don’t ignore offline opportunities. Pop-up shops, local markets, and festivals are great for testing products without committing to a permanent space. Pitching your line to local boutiques on consignment can also help you expand beyond online sales.
"The key to social media is consistency. I think you have to post every day, but it also has to be interesting." – Sarah Donofrio, Fashion Designer
Track Your Sales Performance
Once your store is live and your marketing is underway, keep a close eye on your performance. Use your ecommerce platform’s analytics to monitor sales, traffic, and customer behavior. Pay attention to metrics like conversion rates (aim for 1.5%–2.5% in fashion ecommerce), Average Order Value (AOV), and cart abandonment rates.
To assess inventory profitability, calculate your Gross Margin Return on Inventory (GMROI) with this formula: Gross Profit ÷ Average Inventory Cost. A result above 1 indicates profitability, while a result below 1 suggests that cash may be tied up in slow-moving items. Regularly review your best-sellers and adjust your production plans accordingly.
Customer feedback is just as important as raw data. Comments on social media, product reviews, and support messages can highlight issues or trends that numbers might miss. For example, if several customers mention that a hoodie runs small, update your product description and sizing chart promptly. Tools like Google Analytics can also help you understand your audience and refine your marketing strategy.
Lastly, evaluate how each marketing channel performs. If Instagram ads drive more sales than email campaigns, consider reallocating your budget. Even small changes can make a noticeable difference - Pierre Hardy, a French luxury brand, increased revenue by 22% with a subtle onsite notification feed promoting new collections while maintaining a clean website aesthetic.
With consistent monitoring and adjustments, your store can thrive in the competitive fashion ecommerce landscape.
Conclusion
Starting a clothing line in 2026 isn’t reserved for fashion insiders - it’s an opportunity for anyone with a clear vision and the determination to make it happen. This guide has outlined a step-by-step process to take your idea from concept to launch, paving the way for success in a global fashion market worth nearly $2 trillion.
As executive coach Debra Benton wisely said:
"The truth is that persistence and drive override skill. You can be really good at what you do, but if you don't persist in performing well, you will not accomplish your goals".
Building a clothing brand is a long-term commitment. Challenges will arise, but persistence and adaptability are what ultimately lead to success.
One of the most important decisions you’ll face is selecting the right manufacturing partner. A staggering 90% of clothing brands fail due to a lack of technical expertise in industrial production. Working with an experienced manufacturer can bridge this gap, ensuring your designs are produced with precision. With options like low minimum order quantities (as few as 50 units), design assistance, and thorough quality control, you can focus on creativity while leaving the production details to the experts. This approach allows you to test demand without overcommitting on inventory.
The fashion industry has shifted dramatically, moving away from mass production toward agile sourcing. Success now hinges on responding to trends quickly while maintaining authenticity. Starting small is essential. Build momentum by validating your ideas - aim for a waitlist of 150–300 email subscribers before making bulk orders. To connect with your audience, consider sharing behind-the-scenes, documentary-style content on social media. This transparency builds trust and sets you apart from competitors [2, 43]. Narrowing your focus to a specific niche is your secret weapon in a crowded market.
With your plan in place and your vision sharpened, the next step is simple: start. Whether it’s sketching your first designs, researching your audience, or creating a "Coming Soon" landing page, take action today. The fashion world is ready for your unique perspective - now it’s time to make it a reality.
FAQs
How do I choose a niche that will actually sell?
To find a niche that thrives, start by digging into what your target audience wants and what your competitors are offering. Pinpoint the specific styles, colors, or types of clothing your audience is actively searching for. Look for areas where demand exists, but options are limited - these gaps can be your opportunity.
Think about your ideal customer's lifestyle. Are they into activewear, festival outfits, or professional workwear? Each of these categories caters to a distinct audience, so aligning your niche with their daily needs or passions can make a big difference.
Leverage tools like social media platforms, fashion blogs, and community forums to keep tabs on emerging trends and customer preferences. Additionally, study your competitors closely to see where you can differentiate yourself - whether it’s through unique designs, pricing, or branding.
What’s the cheapest way to start a clothing line in the U.S.?
The cheapest way to launch a clothing line in the U.S. is by leveraging print-on-demand (POD) services. With POD, you can skip the upfront inventory costs, which significantly lowers financial risks. Start small by offering a limited product line and using pre-orders to test demand. To keep branding costs low, take advantage of free or inexpensive tools available online. Pair this approach with digital marketing strategies, such as social media, to build your brand without breaking the bank.
How do I find a manufacturer with low MOQs I can trust?
To locate a reliable manufacturer offering low MOQs (Minimum Order Quantities), focus on those that openly promote low MOQs while highlighting clear pricing, adaptable production options, and strong communication. Ask for samples and references to confirm their quality and dependability. Engaging with online forums and communities can also be a great way to gather advice from other business owners. Begin with smaller orders to establish trust and confirm their processes align with your expectations.