Tech packs are essential for turning your garment designs into physical products. They act as a detailed blueprint that manufacturers use to ensure your vision is accurately produced. A tech pack includes sketches, measurements, materials, and construction details, reducing errors, saving time, and cutting costs during production. Brands using tech packs typically complete production in fewer sampling rounds, saving $380–$950 per design. Without one, you risk delays, miscommunication, and costly mistakes.
Key Elements of a Tech Pack:
- Flat Sketches: Black-and-white drawings showing all angles and intricate details.
- Measurements & Grading: Exact dimensions, tolerances, and size adjustments.
- Bill of Materials (BOM): A detailed list of fabrics, trims, and components.
- Colors & Artwork: Precise color codes, print placements, and techniques.
- Construction Details: Stitch types, seam allowances, and finishing instructions.
Creating a tech pack involves tools like Adobe Illustrator, Techpacker, or even Google Sheets for organization. The process requires precision and attention to detail but ensures smoother production and better quality control. Investing time in a well-made tech pack can save money and prevent production headaches.
How To Make The Perfect Tech Pack For Your Clothing Brand (Step-by-Step Tutorial)
sbb-itb-76527d2
What Goes Into a Tech Pack
Creating a clear and comprehensive tech pack is essential for keeping production on track and avoiding costly mistakes. A well-structured tech pack is built around five key components, each designed to streamline communication with manufacturers. Let’s break down these elements and their role in ensuring a smooth production process.
Flat Sketches
Flat sketches are detailed, black-and-white line drawings that showcase your garment from multiple angles - front, back, and side views at a minimum. Think of them as the blueprint for your design, laying out construction details without any room for artistic interpretation. Use solid lines to represent seams, dashed lines for stitching, and include callouts (zoomed-in diagrams with arrows) for intricate features like pocket designs, collar shapes, or reinforcements.
"The quality of a finished product completely depends on the 'quality' of this communication [the tech pack]".
Measurements and Size Grading
Precision is key when it comes to measurements. Every dimension of your garment - chest width, sleeve length, body length, and more - needs to be clearly defined. For reference, a simple t-shirt might require 15–20 measurements, while a complex jacket could need over 40. A Point of Measure (POM) diagram is crucial here, showing exactly where each measurement is taken. Be sure to specify whether measurements are "laid flat" or "circumference" and include tolerances (e.g., ±0.5 inches) to guide quality control. When grading sizes, start with a base size (like Medium) and establish rules for how measurements change across the size range. This ensures the garment maintains its intended shape, even in larger sizes.
Bill of Materials (BOM)
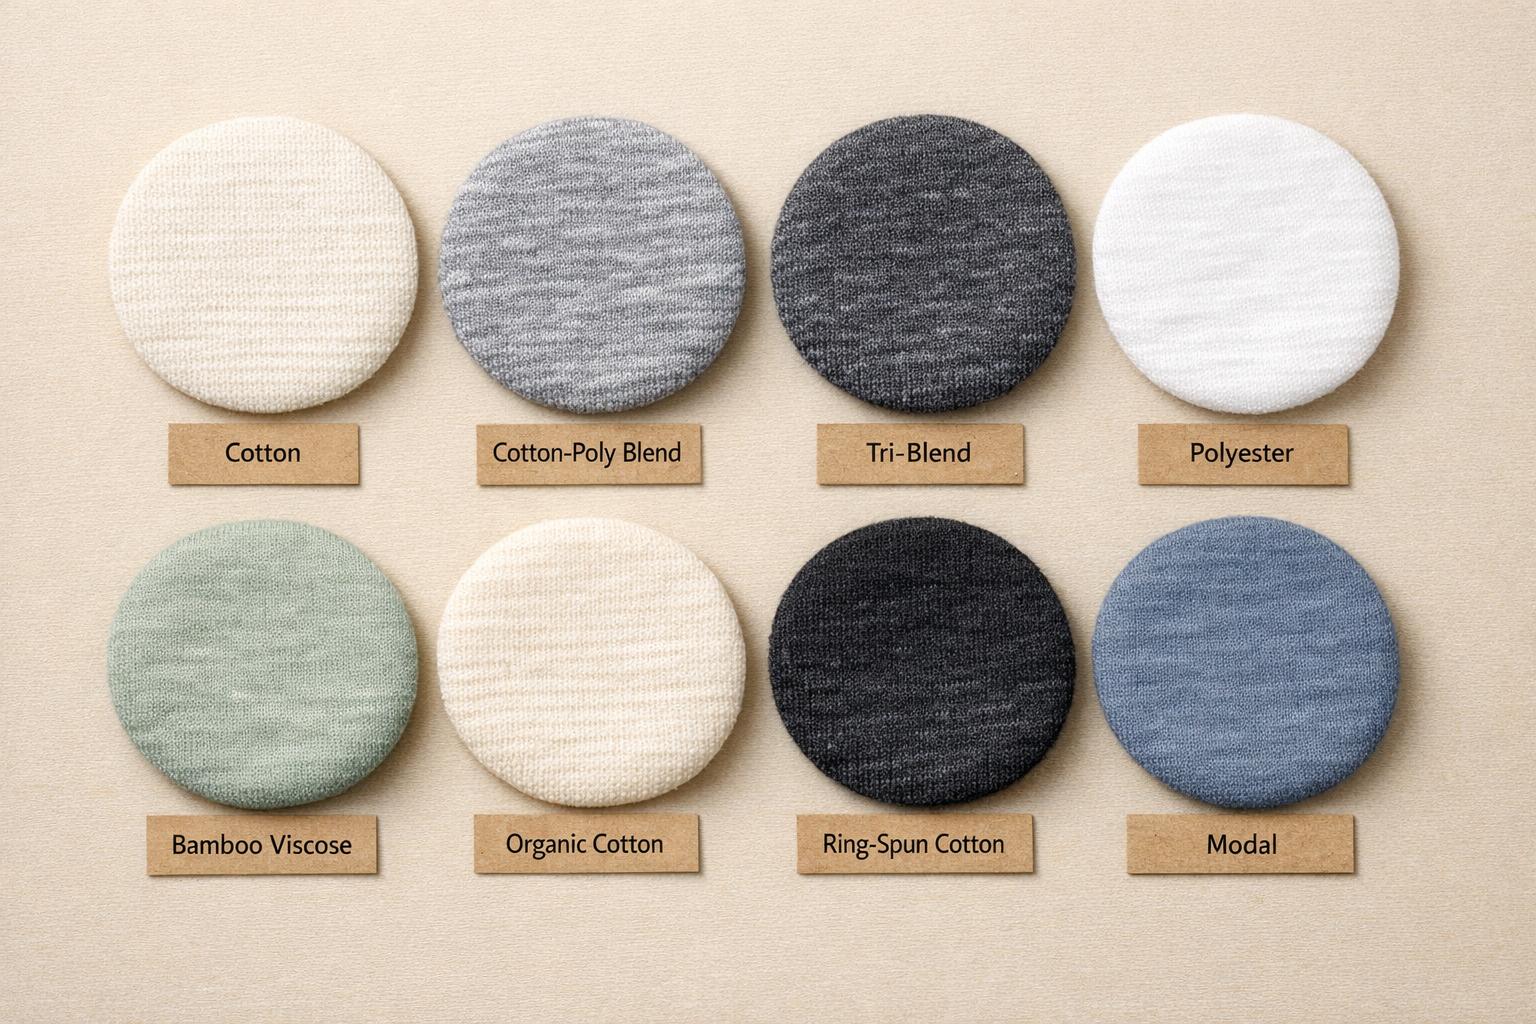
The BOM is essentially the recipe for your garment, listing every material and component required. This includes main fabrics, linings, threads, zippers, buttons, labels, and even packaging materials. For each item, provide detailed specs like fabric composition, weight (in GSM), weave type, and Pantone TCX color codes. For trims and other components, include dimensions, material details, and supplier SKU numbers. Don’t overlook smaller items like interfacing, pocket bags, or interlining - they’re just as important.
"A Bill of Materials is behind every production order. It would be very difficult to schedule and start production if there was no guide telling the factory what parts are required and how they fit together".
Colors, Prints, and Artwork
Avoid vague color descriptions like "navy blue" or "forest green", as they can be subjective and vary across screens. Instead, use standardized Pantone TCX codes for every color in your design. For prints and embroidery, include detailed instructions such as placement coordinates, dimensions, and the production technique (e.g., screen-printing, heat-transfer, or digital printing). If your design has multiple colorways, provide separate specifications to ensure consistency across all trims and threads.
Construction and Production Details
This section outlines how the garment should be assembled. Include details like stitch types (e.g., overlock or lockstitch), stitches per inch (SPI), and seam allowances - these factors directly impact the garment’s durability and quality. Specify seam styles (flat-felled, French-seamed, serged, etc.), label placement, and finishing techniques. If your design requires special treatments like stone-washing or enzyme-washing, make sure to include those instructions as well. Clear guidelines here reduce errors and streamline the sampling and production process.
| Component | Key Details to Include | Purpose in Production |
|---|---|---|
| Flat Sketches | Front, back, and side views; callouts for complex details | Provides a clear visual guide for construction |
| BOM | Fabric specs, trims, and supplier details | Ensures accurate material sourcing and costing |
| Spec Sheet | POM diagrams, base size measurements, and tolerances | Helps maintain quality control and proper fit |
| Grading | Size range rules (e.g., XS–XL) | Ensures proportional fit across all sizes |
| Construction | Stitch types, SPI, seam allowances, and finishing details | Defines garment durability and overall quality |
With these components in place, your tech pack will serve as a detailed, reliable guide for manufacturers, ensuring your vision is executed exactly as intended.
How to Create a Tech Pack: Step-by-Step
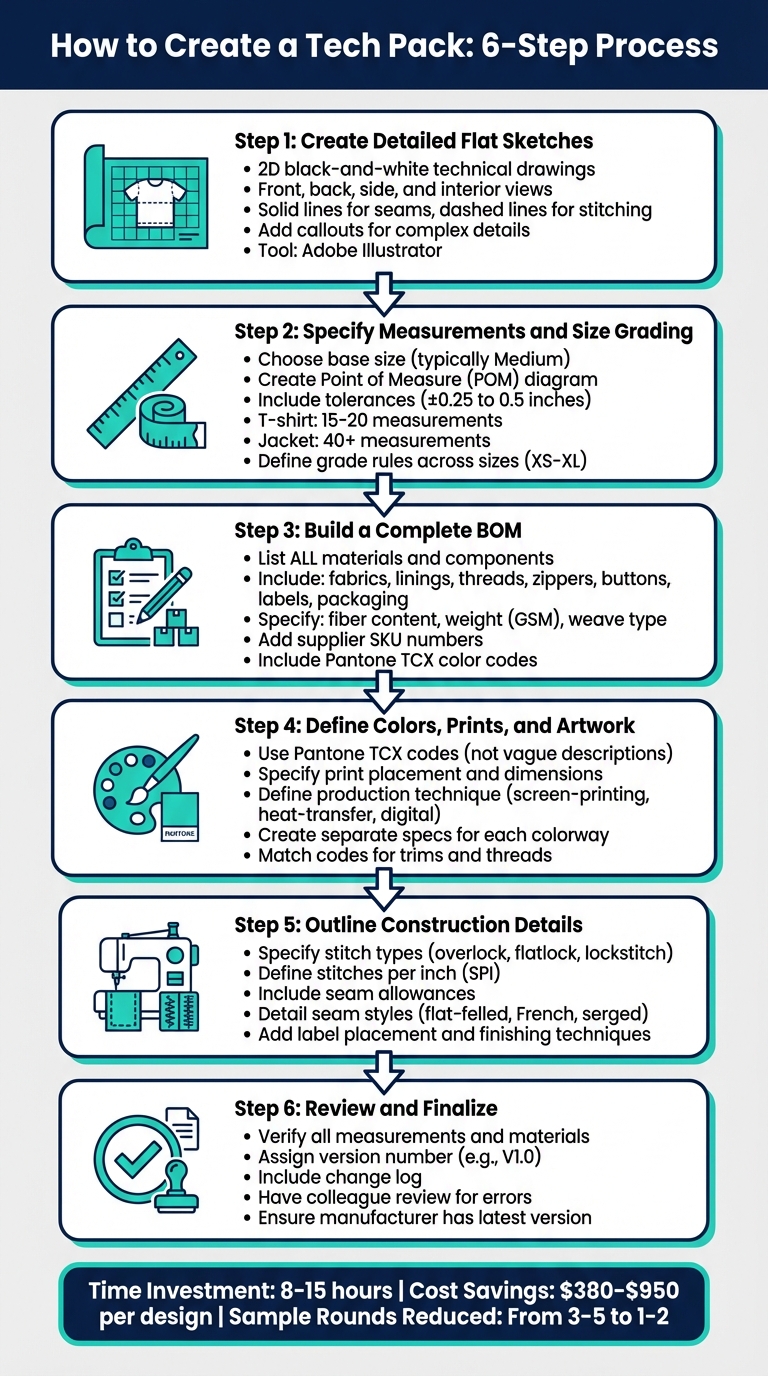
How to Create a Tech Pack in 6 Steps
Turning your design into a production-ready tech pack may seem daunting, but breaking it into clear steps makes the process manageable. Each step builds on the last, creating a detailed document that manufacturers can confidently follow.
Step 1: Create Detailed Flat Sketches
Start by crafting precise 2D black-and-white technical drawings of your garment laid flat. These sketches are not about artistic flair - they’re blueprints. Use solid lines for seams and dashed lines for stitching, and include views of the front, back, sides, and interior. This gives manufacturers a complete picture of your design. Tools like Adobe Illustrator are widely used for these vector-based drawings.
To ensure clarity, add callouts - zoomed-in sketches with arrows - to highlight tricky details like pocket reinforcements, hidden closures, or unique collar designs.
Step 2: Specify Measurements and Size Grading
Choose a base size, often Medium, to establish initial measurements. Create a Point of Measure (POM) diagram to show exactly where each measurement is taken, such as chest width, sleeve length, or body length. Assign unique codes to each POM (e.g., "A" for chest width, "B" for waist) to keep your spec sheet organized and easy to understand.
Always include tolerances for each measurement. For example, standard tolerances might range from ±0.25 to 0.5 inches. A small discrepancy might work for an oversized tee but could ruin the fit of a tailored blazer. Define these tolerances clearly for every key measurement.
Next, establish grade rules to outline how measurements change across sizes. For instance, a 1-inch increase in chest width from Small to Medium. If you don’t specify these rules, the factory might use its own grading system, which may not align with your vision. Organize this in a table with POMs in rows and sizes (XS, S, M, L, XL) in columns for clarity.
Step 3: Build a Complete BOM
The Bill of Materials (BOM) lists every component needed to produce your garment. This includes main fabrics, lining, thread, zippers, buttons, labels, and even packaging materials like poly bags. For each item, provide detailed specifications such as fiber content, weight (in GSM), weave type, and finish.
Avoid vague descriptions. Instead of "soft cotton", write "100% combed ring-spun cotton single jersey, 180 GSM". Include supplier SKU numbers, Pantone TCX color codes, placement on the garment, and exact quantities per unit. Don’t forget hidden components like interfacing or shoulder padding.
Organize this information in a table with columns for Component Name, Supplier/SKU, Color/Code, Placement, Quantity, and Description.
Step 4: Define Colors, Prints, and Artwork
Use standardized Pantone TCX codes for every color in your design to ensure consistency across materials and suppliers. For prints, embroidery, or graphics, include exact placement, dimensions, and production techniques (e.g., digital printing or heat transfer).
If your design includes multiple colorways, create separate specs for each variation. Be sure to match Pantone codes for trims and threads to maintain uniformity throughout the garment.
Step 5: Outline Construction and Production Details
Document the garment assembly process in detail. Specify stitch types (e.g., overlock, flatlock, lockstitch), stitches per inch (SPI), and seam allowances. Define seam styles, such as flat-felled, French seams, or serged seams, and include instructions for label placement and finishing techniques.
Research shows that unclear tech packs often lead to "sample churn", where multiple prototypes are needed to correct errors - an expensive and time-consuming issue.
Step 6: Review and Finalize the Tech Pack
Before sending your tech pack to the manufacturer, review it thoroughly. Ensure all measurements are accurate, materials are fully detailed, and construction instructions are clear. Assign a version number (e.g., V1.0) and include a change log for future updates. This helps ensure that manufacturers always work with the most up-to-date version.
Have a colleague or technical designer review the document for errors. Catching small mistakes now can save significant time and money later.
"A tech pack is the most important document you will make when converting a design into a true product. You may think of it as a blueprint".
Tools and Tips for Creating Tech Packs
Digital Tools for Tech Packs
When it comes to creating technical sketches, Adobe Illustrator is the go-to tool in the fashion industry. Its ability to produce precise vector drawings ensures that designs can be scaled without losing quality, making it perfect for fashion flats. For those aiming to simplify their workflow, Tech Pack Wizard offers a handy Illustrator plugin. Its "Linked Sketches" feature is particularly useful, as it automatically updates all instances of a sketch when the primary version is edited.
Cloud-based platforms like Techpacker take organization to the next level with their visual "card" system, which consolidates sketches, BOMs (Bill of Materials), and measurements in one place. Impressively, over 15,000 fashion brands rely on Techpacker for managing production online, and it also integrates seamlessly with Illustrator via a plugin. Another option, Uphance, provides real-time collaboration tools, allowing manufacturers to comment directly and track updates. For brands on a tighter budget, tools like Microsoft Excel or Google Sheets can help organize BOMs and measurements, though they lack automation and version control features.
These tools can easily align with OneAimApparel's support system, making the process of developing tech packs smoother and more efficient.
How OneAimApparel Supports Tech Pack Development
OneAimApparel offers comprehensive design and sampling services, transforming creative ideas into production-ready tech packs. Their expertise in technical design ensures that every tech pack is thorough and precise, minimizing the risk of miscommunication with manufacturers. This support is particularly beneficial for newer brands navigating their first production runs.
OneAimApparel also helps brands stay flexible by offering a low minimum order quantity of just 50 units. This makes it easier to test designs without committing to large inventories. Additionally, their quality control measures catch potential issues early, saving brands from costly mistakes during production.
Tips for Accuracy and Efficiency
While digital tools are invaluable, maintaining clarity and consistency is just as important for creating effective tech packs.
Clarity over aesthetics. As AITechPacks puts it:
"Accuracy beats aesthetics. Clear callouts beat pretty layouts. Consistent units beat creative formatting".
Use arrows and concise labels in your sketches to ensure fast and clear communication. Stick to a single unit of measurement - either inches or centimeters - throughout your document to avoid confusion and manufacturing errors.
Version control is key. Clearly label every revision (e.g., "Style_V3_03-08-2026") so everyone involved works from the most up-to-date file. Before sending your tech pack, do a final check to confirm that all external artwork filenames match their references in the BOM. This small step can save significant time and trouble later on.
Conclusion
Tech packs play a crucial role in turning creative concepts into tangible garments. As Innovate Apparel describes:
"A tech pack is a universal language between designers, brands, and manufacturers that removes doubts and ambiguity".
Without a tech pack, you risk leaving critical decisions to guesswork, which often leads to expensive mistakes and excessive sampling rounds. A well-prepared tech pack can streamline production, saving both time and money.
For instance, a complete tech pack can reduce sample rounds to just 1–2 (costing $150–$600), compared to 3–5 rounds (costing $450–$1,500 or more). This efficiency not only cuts production timelines by weeks but also minimizes unnecessary expenses.
Creating a tech pack generally requires 8–15 hours of focused effort, but this investment pays off by ensuring consistent quality and simplifying manufacturer transitions.
Given these advantages, professional assistance can make a big difference. OneAimApparel offers design and sampling services, helping you launch your collection with a low minimum order of 50 units, strict quality control, and expert guidance to avoid costly production errors.
FAQs
Do I need a tech pack before I request samples?
A tech pack is absolutely essential before requesting samples. Think of it as a comprehensive blueprint that spells out every detail of your garment, including measurements, materials, construction methods, and finishes. By providing this clear guide, manufacturers know exactly what you're looking for. This reduces the chances of errors, delays, or receiving samples that don't meet your expectations. In short, a well-prepared tech pack simplifies communication and ensures samples are produced accurately.
What should I send if I don’t have exact measurements yet?
If you’re unsure of exact measurements, provide your manufacturer with approximate or range-based measurements instead. This gives them a starting point to understand your size requirements and produce initial samples. Just make sure to include a note clarifying that these measurements are preliminary and will be finalized later. Clear and upfront communication like this helps keep production flexible and prevents unnecessary delays.
How do I prevent factories from using the wrong version?
To make sure factories are working with the right version of your tech pack, it's essential to clearly label every update and explicitly communicate any changes. A pre-production checklist is a great tool to double-check everything for accuracy before sending it off. Using digital tech packs that highlight updates can also simplify tracking changes and reduce the risk of mistakes. Staying consistent with version control and maintaining clear communication are crucial for avoiding confusion and ensuring the factory uses the correct version.