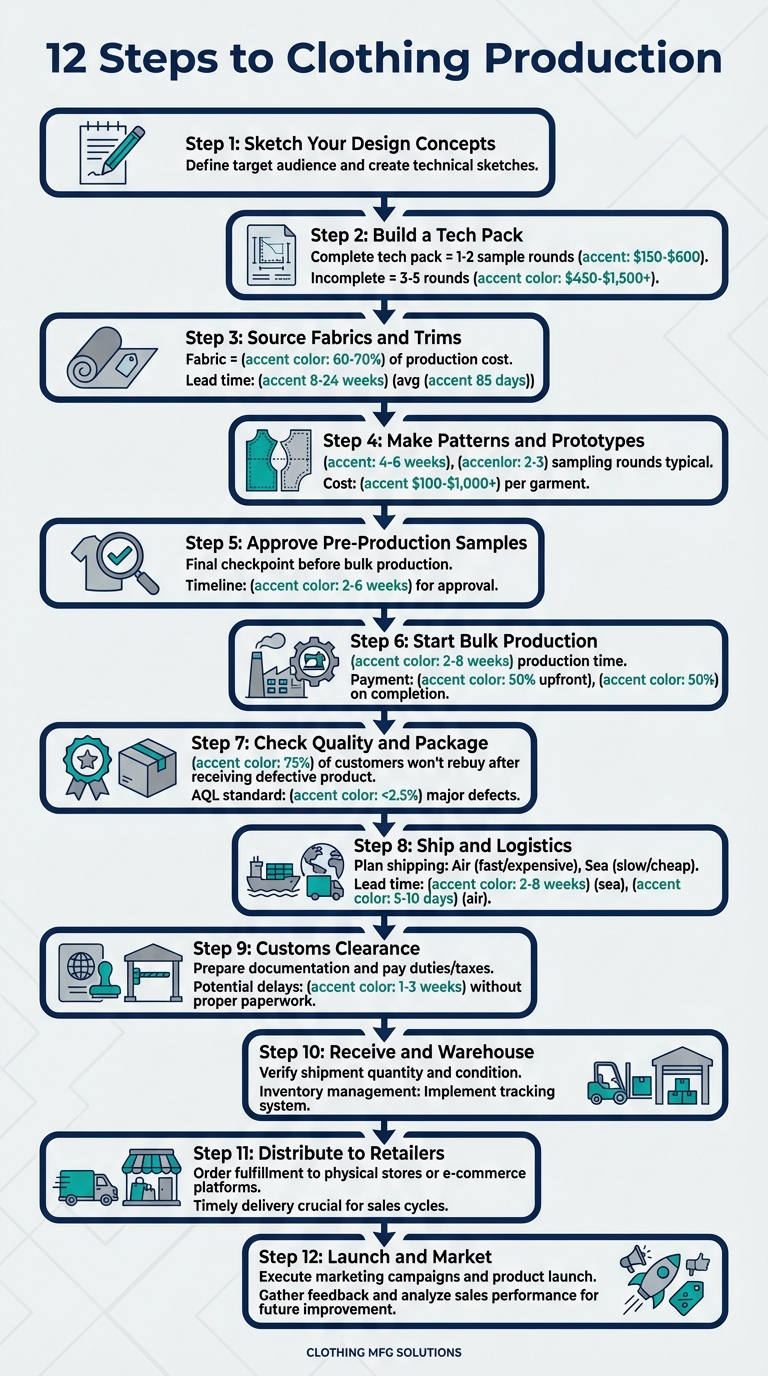
Transforming a clothing design into a finished product requires a clear, step-by-step process. Without proper preparation, you risk delays, quality issues, and financial losses. This 12-step manufacturing checklist ensures you stay on track, reduce errors, and produce garments efficiently. Here's a quick overview:
- Sketch Your Design Concepts: Define your target audience and create detailed sketches with technical specifications.
- Build a Tech Pack: Compile all garment details into a factory-ready document, including measurements, materials, and construction notes.
- Source Fabrics and Trims: Find suppliers, test materials, and confirm specifications match your design.
- Make Patterns and Prototypes: Develop patterns, create prototypes, and test for fit and functionality.
- Approve Pre-Production Samples: Finalize a sample using actual production materials to ensure accuracy before bulk manufacturing.
- Start Bulk Production: Coordinate with your factory to scale production while monitoring quality and efficiency.
- Check Quality and Package: Inspect garments, resolve defects, and package them for shipment.
Each step is vital to ensuring your designs meet quality standards and align with your budget. By following this structured approach, you minimize risks and maximize the success of your clothing line.
12-Step Clothing Manufacturing Process from Design to Shipment
The Complete Fashion Design to Production Process
sbb-itb-76527d2
Step 1: Sketch Your Design Concepts
Every garment begins with an idea, but turning that idea into a reality requires a solid plan. Before you even start sketching, think about who your clothing is for. This understanding should guide every decision you make during production. A design that looks great on Instagram might run into major issues during manufacturing if sizing is unclear, materials are unspecified, or the garment can't hit your target price point.
Identify Your Target Audience
Knowing your target audience goes far beyond general categories like "women aged 25–34." For production, you need to dive into specific details. Consider physical characteristics and how your garment will be used - this directly impacts fabric choices, construction methods, and costs. For instance, high-impact activewear requires different materials and seam construction compared to lounge or resort wear. Customer preferences, such as oversized versus fitted or high-rise versus mid-rise, shape your pattern grading and size charts.
Your price point also plays a major role. If you’re aiming for a $50 retail price, you can’t use the same materials or methods as a $200 garment. Additionally, think about how customers will care for the item - machine wash, dry clean, or wrinkle resistance - since this affects fabric selection early on. Climate and seasonality are equally important; lighter fabrics and breathable designs suit summer, while thicker materials and layering options are better for winter.
Specialized designs not only improve production accuracy but can also reduce e-commerce returns by up to 25%, thanks to better fit consistency.
Draw Your First Sketches
Once you’ve nailed down your audience, it’s time to sketch. Start with rough designs using fashion croquis to outline the style, shape, and key features while keeping proportions realistic. Focus on technical details like seams, pockets, and graphics rather than artistic embellishments. Always include both front and back views to make things clear for manufacturers.
Begin by creating a mood board - it could be digital (like Pinterest) or physical - to gather inspiration from images, textures, and colors. Use this visual foundation to move from rough sketches to 2D technical flats. These vector drawings provide clean, professional layouts that manufacturers can work with. Tools like Adobe Illustrator or Procreate are perfect for this, as vector files (.AI or .EPS) maintain quality when scaled and are factory-friendly. Include detailed design callouts to highlight unique elements or construction needs, and specify fabric weight (GSM), composition, and expected stretch.
To keep things manageable and focused, limit your first collection to three to five cohesive pieces. This approach ensures a clear brand message and helps maintain quality. The goal here isn’t just to create pretty sketches but to produce production-ready documentation that manufacturers can follow precisely. Once your sketches are complete, you’re ready to move on to building your tech pack.
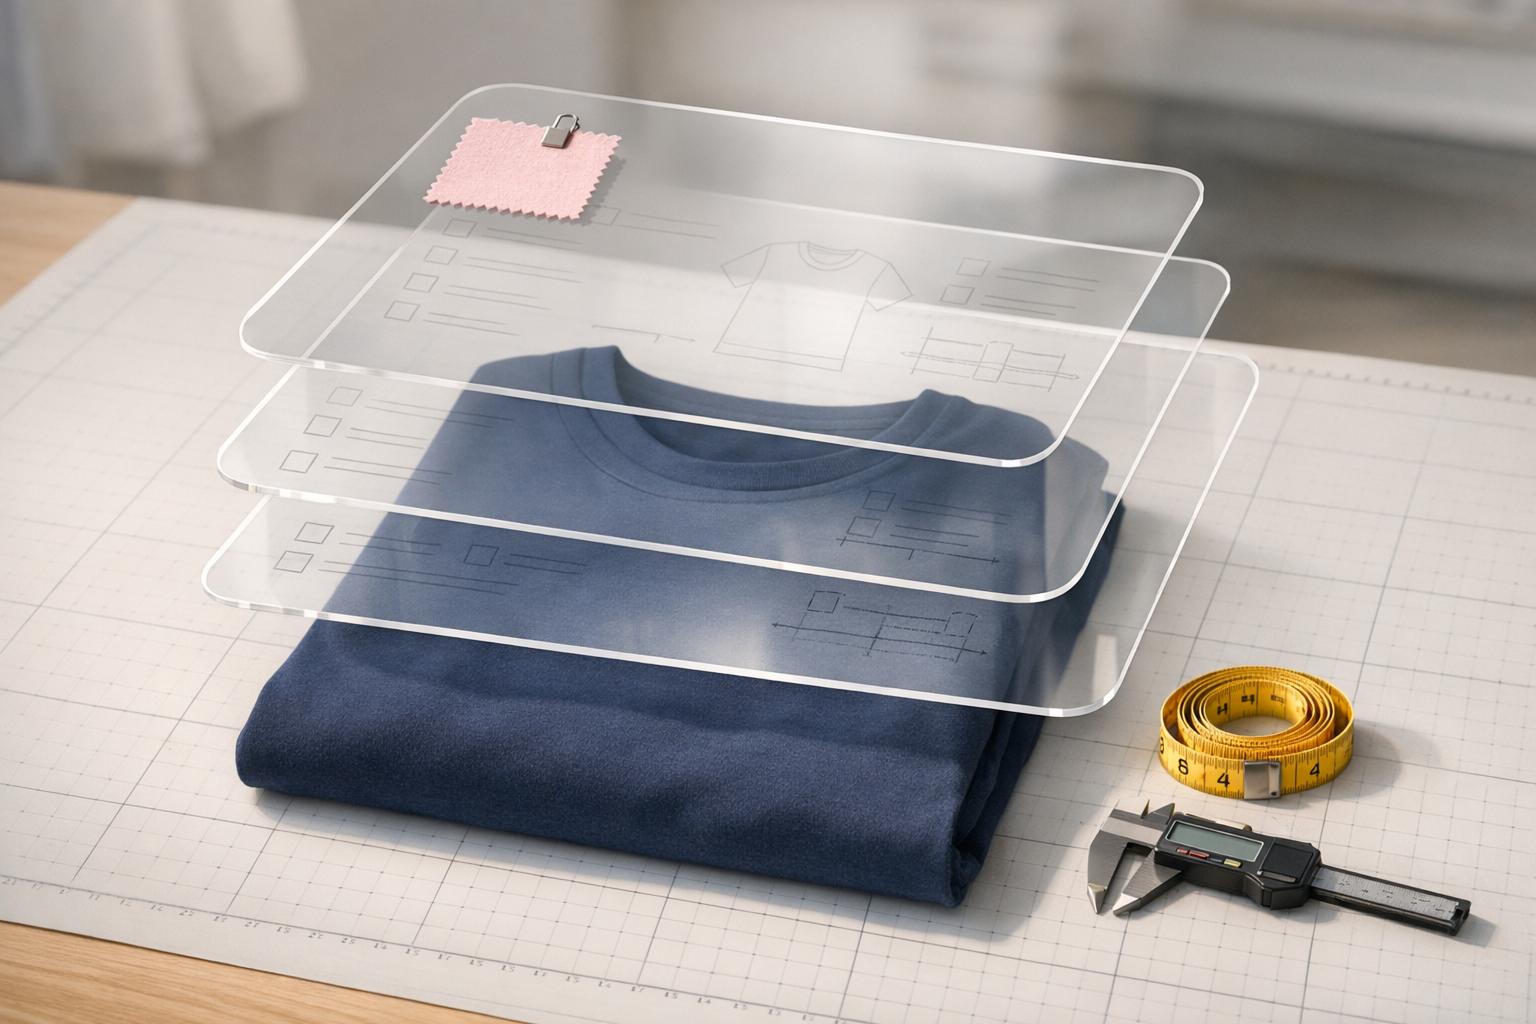
Step 2: Build a Tech Pack
Think of a tech pack as the instruction manual for your garment. It translates your design sketches into precise, actionable specifications that align everyone involved - from designers to pattern makers to quality control teams. Without a detailed tech pack, factories might make assumptions, leading to extra sample rounds, delays, and higher costs.
The numbers tell the story: brands with a complete tech pack often need just 1–2 sample rounds, costing $150–$600. In contrast, those without one may face 3–5 rounds, with costs climbing to $450–$1,500 or more. Creating a tech pack for a single garment can take an experienced designer 8–15 hours. These figures highlight the importance of getting every detail right.
List All Specifications
A thorough tech pack captures every detail that influences your garment’s appearance, fit, and functionality. Start with a cover page that includes key details like the style code, season, garment category, target market, sample size, and a thumbnail sketch for easy reference. Add flat vector sketches that show all views, complete with stitch lines, seam placements, and hardware positions.
Next, create a detailed Bill of Materials (BOM). This should specify every fabric, trim, and accessory in exact terms. For example, instead of saying "soft cotton", describe it as "100% combed cotton jersey, 180 GSM, 40s yarn count." Include Pantone codes for colors to eliminate guesswork.
Measurements are another critical component. List base size measurements with target values and tolerances of ±0.25–0.5 inches. Be clear about where measurements are taken - e.g., "Chest width: 1 inch below the armhole." A graded size chart should show how these measurements scale across your size range.
Don’t forget construction details. Specify seam types, stitch density (stitches per inch), and reinforcement points like bar-tacks. For colorways and artwork, include Pantone references and scaled diagrams showing placement, along with measurements from key landmarks like the neckline. Add instructions for label placement, folding, polybag dimensions, and carton labeling. Lastly, keep a change log to ensure everyone is working from the latest version.
"From the factory's perspective, a tech pack is the basis of every decision they make about your order. Without one, they are guessing, and guessing costs you money."
– James Kennemer, Cosmo Sourcing
Use Tech Pack Templates
Once you’ve detailed your specifications, templates help you organize and standardize everything. They consolidate all your information into one document while ensuring consistency in units, naming, and measurement definitions.
For simpler garments like t-shirts, tools like Excel or Google Sheets work well. They’re free and effective for organizing data but might fall short when it comes to detailed drawings. Adobe Illustrator, on the other hand, allows for crisp vector sketches but requires a subscription and has a steep learning curve. As your brand scales, specialized PLM software offers features like automated PDF exports, dynamic BOM components, and version control. However, these tools can be pricey and may include features small teams don’t need.
Creating a tech pack in the U.S. typically costs between $150 and $500 per style, though complex designs like tailored jackets can cost $800 or more. Freelance technical designers charge anywhere from $50 to $300 depending on complexity, while AI-based platforms offer subscriptions starting at around $28 per month.
"A solid tech pack template is your garment's single source of truth. It turns sketches, notes, and emails into a factory-ready document that speeds up sampling, reduces mistakes, and keeps costs predictable."
– aitechpacks.com
To ensure consistency across styles and seasons, standardize your templates. Use clear vector graphics for seam placements and design details, avoiding overly stylized illustrations that might confuse factories. Always specify tolerances for measurements so quality control teams have clear benchmarks. With your tech pack in hand, you’re ready to move on to sourcing the fabrics and trims that will bring your vision to life.
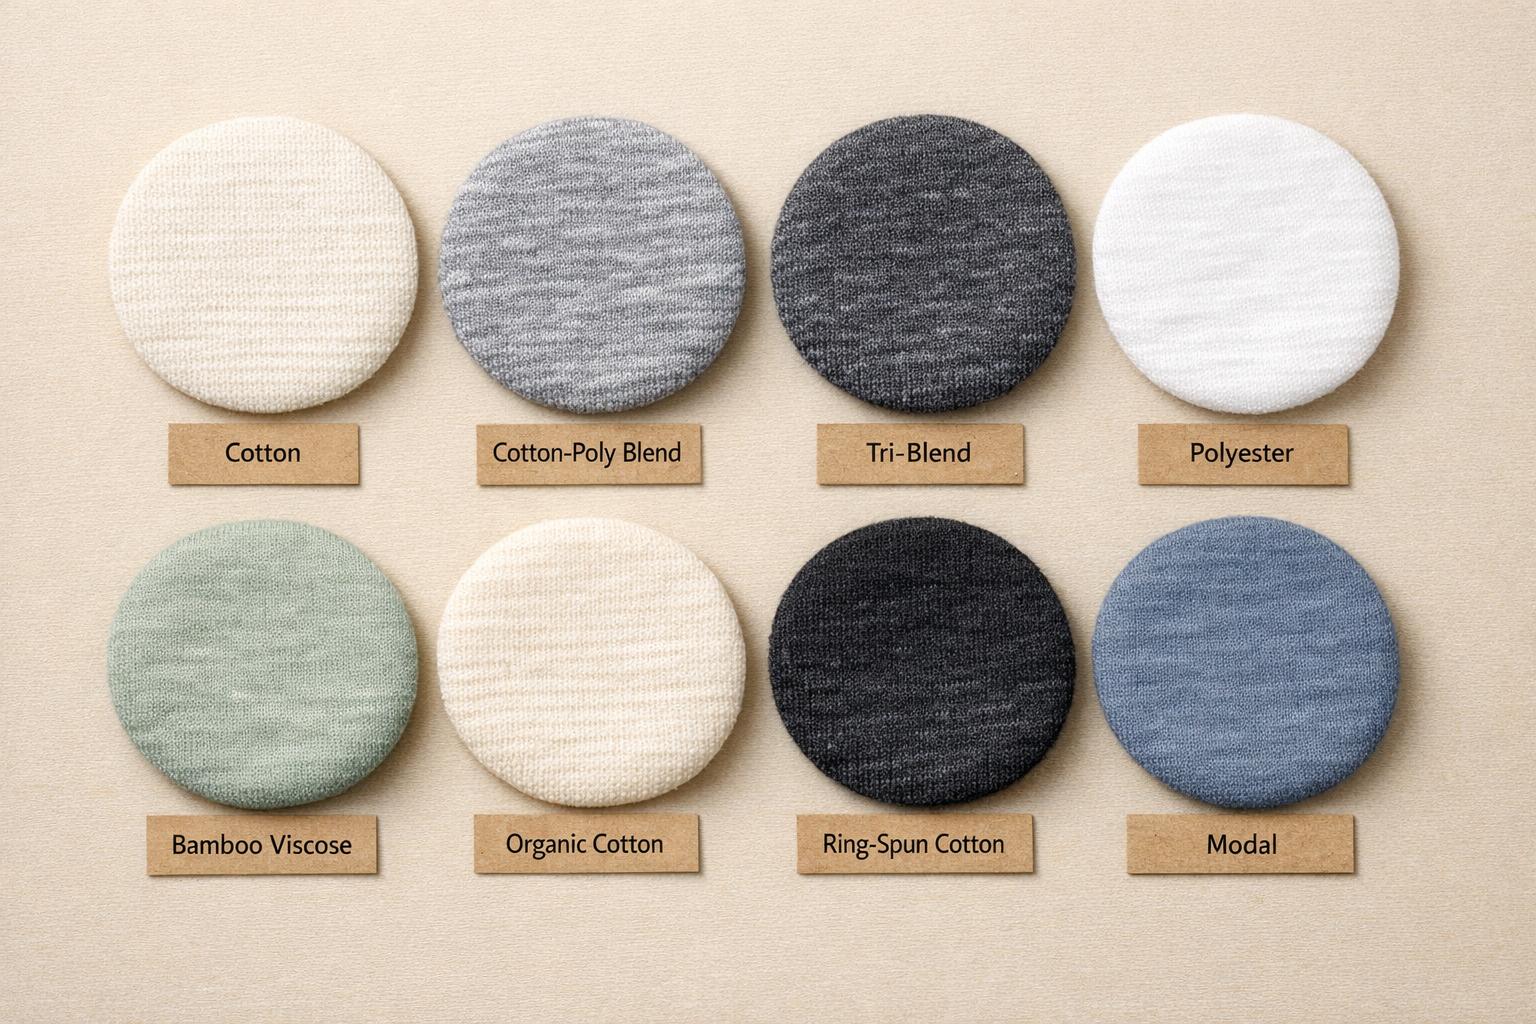
Step 3: Source Fabrics and Trims
Once your tech pack is ready, the next big step is sourcing fabrics. This is a crucial phase since fabric typically makes up 60%–70% of a garment's production cost. The materials you choose can make or break the quality of your product, and poor choices could throw off your timeline and budget.
The sustainable fabrics market is booming, valued at $33 billion in 2024 and growing at 13% annually. Meanwhile, material production lead times can range from 8 to 24 weeks, averaging about 85 days. These numbers highlight why it's important to start sourcing early and make smart decisions.
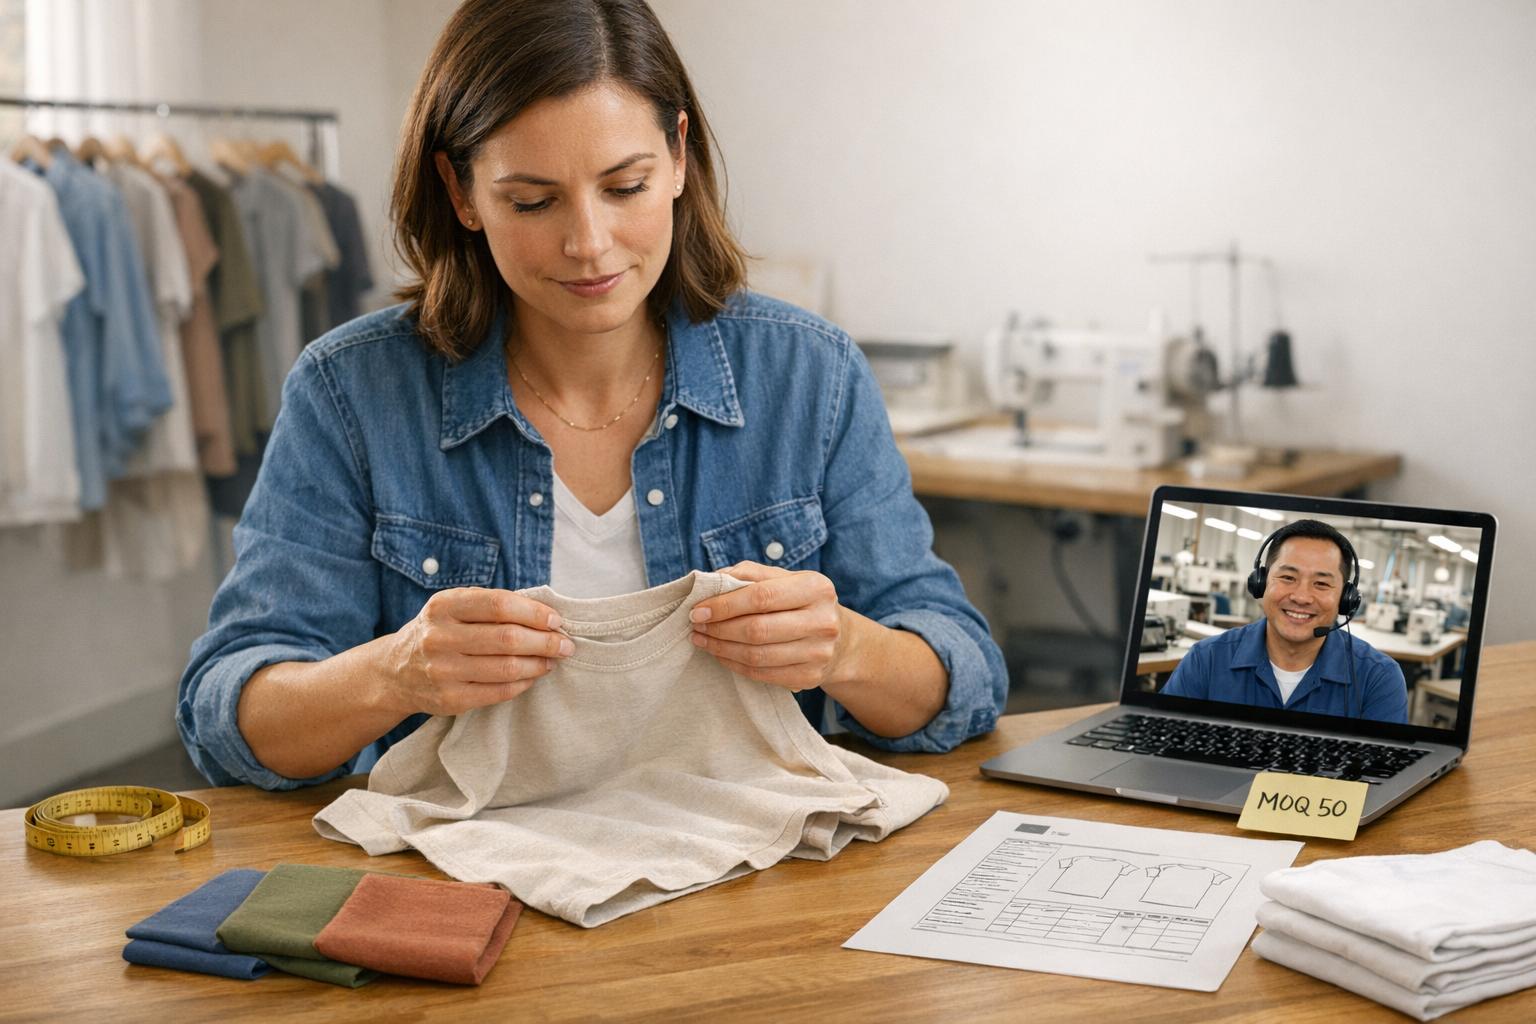
Find Fabric Suppliers
Your first task is to find suppliers that align with the specifications in your tech pack. There are several types of suppliers to consider, each offering different advantages and challenges:
- Mills: They produce fabric directly and usually offer the best per-yard prices. However, they often require large minimum order quantities (MOQs), typically 500 to 1,000+ yards.
- Converters: These suppliers buy unfinished "greige" fabric, dye or print it, and offer lower MOQs, usually starting at around 100 yards.
- Jobbers: They specialize in surplus or deadstock fabrics. Jobbers often have very low MOQs - sometimes as little as 1 yard - and provide immediate availability, though reordering can be tricky.
For in-person sourcing, trade shows like Première Vision (Paris), Texworld USA, and Future Fabrics Expo (London) are excellent opportunities to connect with mills and converters. If you prefer digital options, platforms like SwatchOn and Fibre2Fashion allow you to browse suppliers online with real-time inventory updates.
Before committing to a supplier, ask these 10 key questions:
- What is the article number?
- What is the GSM (grams per square meter)?
- What is the fiber content?
- How does the total width compare to the cuttable width?
- What are the sample and bulk costs?
- What are the MOQs and lead times?
- Where is the fabric produced?
- What care instructions are recommended?
- What certifications does the fabric have?
- Is the fabric re-orderable or limited in availability?
Look for certifications like GOTS (organic standards), OEKO-TEX (chemical safety), GRS (recycled content), or bluesign (environmental safety).
"The right fabric sets the stage. Your choice of fabric types can transform your vision into reality or send it in an entirely different direction."
– Alice James, AJG Fashion Consulting
If a mill's MOQ seems too high, ask if it can be split across multiple colors of the same fabric quality. Alternatively, converters or jobbers may provide options for smaller runs. Startups may also benefit from "stock service" suppliers, who allow lower MOQs by combining different colorways.
Once you've narrowed down your options, it's time to test your material samples.
Test Material Samples
After identifying potential suppliers, order 5 to 10 yards of sample fabric. Be prepared for sample yardage to cost 2 to 4 times the bulk price, with some suppliers adding a flat surcharge for small orders. Fabric hangers or swatches generally range from $5 to $10 each.
When your samples arrive, check that all specifications match your tech pack. Pay attention to the "hand feel" (how the fabric feels to the touch), drape, and stretch recovery to ensure they meet your design requirements. Inspect for issues like pilling, loose threads, or uneven weaves.
Don't just trust supplier data sheets - do your own tests. Wash the fabric to check for shrinkage, color bleeding, seam twisting, or print cracking. For activewear or swimwear, perform a "squat test" to ensure the fabric stays opaque when stretched. If you're unsure about fiber content, a quick burn test can help you distinguish between natural and synthetic materials. Additionally, request lab reports on shrinkage, pilling resistance, and colorfastness to washing, rubbing, and sunlight.
For trims like zippers, buttons, elastics, and drawcords, test their functionality thoroughly. Ensure zippers glide smoothly, buttons fasten securely, elastics maintain tension, and drawcords don’t twist in their channels. Also, confirm that heat transfers don’t peel at the edges.
"Sampling is your quality checkpoint. It's where you confirm whether what you imagined is what the supplier can actually deliver."
– Deepwear
Finally, double-check whether the fabric is re-orderable or a limited deadstock run before placing a bulk order. With tested and approved materials in hand, you're ready to move on to Step 4: Make Patterns and Prototypes.
Step 4: Make Patterns and Prototypes
Turning your tech pack into 3D garment patterns is where your designs start to take shape. This step involves using approved fabric samples to create patterns and prototypes. Costs can vary widely: professional pattern making ranges from $100 for basic tees to over $1,000 for more intricate garments, while initial samples can cost anywhere from $50 to $1,000.
This phase typically takes 4 to 6 weeks, with most designs requiring 2 to 3 rounds of sampling before they're ready for production. Using detailed tech packs can cut down on sampling rounds significantly - by as much as 60% - saving between $300 and $750 per design.
Create Your Patterns
Your tech pack is the foundation for pattern making. It should include essential details like technical drawings, a Bill of Materials (BOM), measurement specifications with tolerances (e.g., +/- 0.5 inches for chest width), and grading rules. If you already have a garment with a great fit - known as a "Like Sample" - you can provide it to your pattern maker to replicate the dimensions more efficiently.
Start by focusing on the middle size of your range, such as Medium if your sizes span XS to XL. Perfect this base size, then grade it up or down to maintain consistent proportions across all sizes. Before cutting into your production fabric, test the pattern using inexpensive materials like muslin, calico, or cotton lawn.
Modern tools streamline this process. Adobe Illustrator is often used for technical drawings, while CAD software digitizes and grades patterns. Tools like CLO, Browzwear, and TUKAcad allow you to create 3D virtual samples, letting you visualize and tweak the fit without wasting fabric. Keep in mind that the production fabric's characteristics - like stretch or thickness - can impact the pattern, so ensure your pattern maker is familiar with the material being used.
"If it doesn't fit, it doesn't sell." – Anna Livermore, Founder, V.Mora
Once your patterns are finalized, move on to constructing prototypes to validate the fit and design.
Sew and Test Prototypes
With your patterns in hand, it’s time to sew your first prototype. This step helps you confirm the design and assess whether the construction is feasible. Expect to go through multiple iterations before achieving the final version.
Fit testing is crucial. Use a live model to evaluate comfort and ease of movement. Have the model sit, walk, bend, and squat to identify any issues, and document everything with measurements and photos. Compare the garment against your tech pack to ensure it meets all tolerances.
Real-world wear tests can uncover hidden issues. Have someone wear the garment in typical conditions, then wash it to check for shrinkage, seam twisting, or color bleeding. For activewear, a squat test ensures the fabric stays opaque when stretched. Also, test functional details like zippers, buttons, and elastics to ensure they work smoothly and hold up under use.
Be specific when documenting feedback. For example, instead of saying, "make it longer", note, "increase HPS to Hem length by 1 inch". Use photos with arrows and captions to highlight problem areas. During fittings, pins can be used to visualize adjustments before updating the pattern.
"A well-executed sampling process and prototype review saves fashion brands heaps of time and money as it helps catch issues early to avoid costly and irreversible mistakes during mass production." – Heidi {Sew Heidi}, Successful Fashion Designer
If producing a full-size set is too expensive, consider requesting jump sizes (e.g., XS, M, XL) to check grading accuracy. Once your prototypes meet all specifications, you’re ready to move on to Step 5: Approve Pre-Production Samples.
Step 5: Approve Pre-Production Samples
The pre-production sample is your last safeguard before diving into bulk manufacturing. At this stage, your design transitions into a repeatable product, but it's also where errors can sneak in. A simple "looks good" without proper checks could lead to hundreds of units with incorrect fits, fabrics, or prints.
Unlike earlier prototypes, the pre-production sample uses the exact materials intended for bulk production - fabric, trims, thread, and all. Most brands anticipate 1–2 rounds of revisions during this phase, with the entire process typically lasting 2–6 weeks.
"Sample approval is the moment your concept becomes a repeatable product. It is also where most expensive mistakes happen, because a single 'looks good' can turn into 500 units with the wrong fit, the wrong fabric hand feel, or a print that does not match your brand standards." – Arcus Apparel Group
Once approved, this "Golden Sample" becomes the standard for production. To avoid confusion, request at least two identical samples - keep one for your records and send the other back to the factory with your signed approval.
Review Sample Accuracy
To ensure your sample matches the tech pack, lay the garment flat and measure each point of measure (POM) against the specifications. Log all measurements in a table and confirm they fall within the allowed tolerances. Check garment balance by comparing front and back lengths, and ensure symmetry across both sides.
Inspect the fabric's weight (GSM), hand feel, and opacity to confirm they align with the tech pack. Compare the sample's color to your Pantone codes or physical standards under consistent lighting, like daylight, and check for shade inconsistencies between panels. Conduct a wash test to identify issues like shrinkage, color bleeding, seam twisting, or print cracking.
| Category | What to Check | Pass Criteria Example |
|---|---|---|
| Measurements | All Points of Measure (POM) | Within approved tolerance (e.g., +/- 0.5") |
| Fabric | Weight, hand feel, and opacity | Matches tech pack specifications and GSM |
| Color | Shade matching and dye lots | Matches Pantone standard under daylight |
| Construction | Stitching, seams, and finishing | No skipped stitches or seam puckering |
| Trims | Zippers, buttons, and elastics | Smooth function and secure attachment |
| Artwork | Print/embroidery placement | Correct scale and position from reference points |
Pay close attention to construction details. Verify stitch type, stitches per inch (SPI), and seam strength, especially at stress points like the crotch and underarms. Test all zippers, buttons, snaps, and elastics to ensure they work smoothly and are securely attached. Confirm that prints, embroidery, or heat transfers are scaled and positioned correctly.
When documenting issues, be specific. Instead of vague feedback like "it feels off", write something actionable, like "increase neck width by 0.5 inches", and include annotated photos to highlight the problem areas. Use clear approval statuses: Approved (ready for bulk production), Approved with Comments (minor changes that don’t need a new sample), Revise and Resubmit (new sample required), or Rejected.
"Approvals aren't paperwork. They're your quality control, your last chance to stop mistakes before they're multiplied by the thousands." – Oceo Luxe
After completing these checks, update your tech pack to reflect every adjustment.
Update Final Specifications
Once the sample passes all checks, finalize the specifications. Update your tech pack with detailed notes, measurements, and photos for clarity. This ensures the factory has an exact reference for bulk production.
Make sure the pre-production samples are created on the same production line that will handle your bulk order - not a separate sample-only line. This step confirms the factory can replicate the approved quality consistently. To avoid delays, aim to issue your final approval at least two weeks before fabric cutting begins. This allows time to address any last-minute issues.
Secure your signed Golden Sample as the definitive reference for production. Both you and the factory should retain identical copies to avoid disputes.
"What you sign off here is what will appear in every carton. Shortcuts now are painful fixes in bulk." – Ninghow
With your pre-production sample approved and all specifications finalized, you're ready to move on to Step 6: Start Bulk Production.
Step 6: Start Bulk Production
Once the pre-production sample gets the green light, it’s time to move into bulk manufacturing. At this stage, even minor errors can snowball, so it’s crucial to have every detail nailed down before fabric hits the cutting table.
"Production begins with math, not emotion." – Mrinal Pal, Author, Maker's Row
Bulk production usually takes 2–8 weeks, with an extra week added as a buffer. Payment terms in most factories are standard: 50% upfront to kick off production and 50% upon completion. Proper planning for materials and cutting at this stage is critical to ensure smooth quality checks later.
Order Materials in Bulk
Getting your material calculations right is non-negotiable. Fabric often makes up 60% to 70% of a garment’s production cost, so even a small misstep here can eat into your profits. Confirm that your fabric supplier can handle your required quantity and meet your timeline. If your fabric isn’t stocked locally, factor in a 4–6 week mill turnaround.
Be aware of the difference between garment manufacturer minimums and fabric mill minimums. For instance, while a factory might accept a 300-unit order, the fabric mill might require you to purchase 800–1,000 yards. Any unused yardage becomes an added cost you’ll have to absorb. To avoid surprises, calculate your landed cost, which includes not just the product price but also setup fees, sample costs, shipping, import taxes, payment fees, and storage.
"The price per shirt is not your final cost. Many new business owners are surprised by hidden fees that can hurt their profits. To budget correctly, you need to calculate your 'landed cost.'" – Alin Zeng, Founder, Manufacturing Clothes
Using certified fabrics like Oeko-Tex or GOTS for organic materials can help minimize returns and consumer complaints. Also, ensure your tech pack includes a detailed Bill of Materials (BOM), complete with measurements and tolerances, to eliminate guesswork for your manufacturer.
Cut and Sew Garments
The cutting and sewing phase is where precision and efficiency directly impact your profit margins. Factories rely on a digital layout called a marker to arrange pattern pieces and optimize fabric usage. A professional factory aims for 85% to 95% marker efficiency, and even a slight improvement of 2–3% can save thousands in fabric costs during large production runs.
For knit or spandex-heavy fabrics, allow a 24-hour resting period before cutting to prevent shrinkage. Always request a "first-cut" approval to verify panels and measurements before full-scale cutting begins.
Sewing operations are timed using Standard Minute Value (SMV), a measure of how long it takes to complete a specific task. For example, a basic t-shirt has an SMV of 8 to 10 minutes. If the factory charges $0.50 per minute, the sewing labor cost for that t-shirt would be $4.50. Factories use SMV data to balance production lines, ensuring steady garment flow and avoiding bottlenecks.
Quality control should be integrated directly into the sewing process. In-line QC catches mistakes early, preventing errors from spreading through the entire production run. Pull a "Top of Production" (TOP) sample at the start of the bulk run to confirm it matches the approved pre-production sample. The industry standard for defect tolerance is about 5%, though top-tier factories can achieve rates below 2%.
"Quality control is not a single step. It is integrated throughout the process, from in-line QC during sewing to end-line QC before packing." – Ellie, Content Specialist, MFG Merch
Stay in the loop by requesting weekly progress updates from your factory. These updates should cover the current production stage, quantities completed, issues identified and resolved, and estimated shipping dates. This transparency helps you address potential problems early. Once the pre-production sample is finalized, freeze all design or specification changes - last-minute revisions at this stage only lead to delays and added costs.
With bulk production and quality checks on track, you’re ready to move to Step 7: Check Quality and Package.
Step 7: Check Quality and Package
The final inspection is the last line of defense before garments make their way to customers. This step is crucial - not just for ensuring product quality but also for maintaining your brand’s reputation. A survey found that 75% of customers wouldn’t buy again from a brand if they received a defective product. That’s a big risk to take.
"A single loose thread can compromise customer trust and damage your brand." – Textilelisting
Most factories use the Acceptable Quality Limit (AQL) sampling method instead of checking every item. For instance, with an AQL of 2.5 for major defects, if more than 2.5% of the sampled garments have serious flaws, the entire batch fails inspection. This method strikes a balance between being thorough and efficient. Defects are typically categorized as:
- Critical: Safety-related issues, such as sharp objects or broken zippers.
- Major: Visible flaws like large stains or incorrect sizing, which could lead to returns.
- Minor: Small imperfections, such as a loose thread, that don’t affect functionality.
Inspect Each Garment
Start by giving inspectors your golden sample - the approved pre-production reference garment. This ensures they have a clear standard for comparison. Inspections should cover:
- Fabric: Look for color inconsistencies, stains, holes, snags, or pilling.
- Seams: Check for skipped stitches, puckering, or uneven topstitching.
- Functionality: Test zippers, buttons, and snaps to ensure they work smoothly and are securely attached.
- Measurements: Confirm dimensions match the tech pack tolerances (usually ±0.25 inches).
- Labels: Ensure care labels, size tags, and brand labels are correctly placed, legible, and accurate.
Screen finished garments with metal detectors to catch stray needles or fragments. This step is non-negotiable for safety.
"The difference between a $2 pre-shipment inspection and a $20,000 product recall demonstrates why proactive quality management matters." – Eric Neuner, CEO, NuShoe
Many factories now use digital quality control platforms for real-time defect tracking, complete with photos. Some even employ AI-powered systems to spot fabric flaws or seam misalignments that human inspectors might miss.
Once garments pass inspection, it’s time to focus on packaging to ensure they arrive in perfect condition.
Package for Shipment
Packaging isn’t just about presentation - it’s about protection. Polybags shield garments from moisture, dust, and stains, while sturdy cartons prevent crushing. Include folding instructions in your tech pack to maintain consistency across batches. Before sealing cartons, ensure garments are lint-free, pressed, and free of loose threads.
Use barcode scanners to double-check SKUs, pricing, and packaging labels. Also, audit outer box labels to confirm order codes, quantities, and care instructions are correct. This prevents shipping errors and delays. Lastly, conduct carton drop tests to make sure your packaging can handle the rough handling of long-distance transport.
"Packaging is a very important part of your product's journey through your supply chain: from ensuring your product isn't damaged in transit, to optimizing your shipping costs, to meeting packaging and labeling regulations in your chosen market." – QIMA
After packaging, perform a final random sampling to confirm the entire batch meets all quality standards. This step ensures that no new issues - like incorrect carton sizes or missing tags - slip through during the packing process. It’s a small effort that can save you big headaches down the line.
Conclusion
A well-structured manufacturing checklist is essential for protecting your investment and maintaining your brand’s reputation. The 12 steps we've outlined work together to create a seamless system that identifies and addresses errors before they escalate into costly issues. Proper preparation not only reduces the need for rework but also lowers overall risk.
This approach has a direct impact on your financial performance. For example, strong apparel brands typically maintain gross margins between 60% and 70%. By refining operations, you can improve efficiency by as much as 20% to 30%. On the flip side, tariffs on certain apparel imports can climb as high as 125%, making streamlined production processes essential to preserving profitability.
Your tech pack serves as the cornerstone for ensuring factories produce garments exactly as intended. Always insist on a Pre-Production (PP) sample for every order - even for repeat styles. This is your final opportunity to catch errors before fabric is cut. Additionally, it’s wise to build a two- to three-week buffer into your production timeline to account for potential shipping delays or customs issues.
"A clothing manufacturer can accelerate a clear project. They cannot fix an undefined one." – Mrinal Pal, Author
From the initial design phase to the final quality control checks, each step in this checklist lays the groundwork for success. The difference between thriving and struggling often boils down to preparation. Treat every step - from your first sketch to the final inspection - as essential. By doing so, you’re not just following a process; you’re creating a reliable system that ensures consistent quality, efficient production, and a brand that earns customer trust.
FAQs
What should I do before I contact a factory?
Before contacting a factory, make sure your design is fully finalized, and all technical documentation is prepared. This should include a complete tech pack, detailed product specifications (covering fabric, construction, size range, and fit), and a bill of materials. Being well-prepared ensures your requirements are clear, minimizes expensive revisions, and allows the factory to provide precise quotes and timelines.
How do I estimate my total cost per garment?
To figure out the total cost for each garment, you’ll need to break everything down into its individual components. This includes fabric, trims, labor, manufacturing overhead, packaging, and shipping. Add these together, and you’ll have your production cost.
To keep things accurate, it’s a good idea to create a detailed bill of materials (BOM). This document outlines every component, helping you avoid missing any expense.
Once you know your production cost, consider your target retail price and desired profit margin. This step helps you refine your estimate and make sure your costs match your financial goals.
When should I hire a third-party inspector?
Hiring a third-party inspector during the quality inspection phase of your clothing production process is a smart move. This step becomes especially critical during pre-shipment checks to confirm that your garments meet quality standards before they leave the factory. An experienced inspector can help you avoid costly returns, rework, and even damage to your brand's reputation by ensuring the products align with your specifications and meet market expectations.